Our Favorite Running GPS Watches
For our current favorite GPS watches for running, check out our Best GPS running watches guide.
Suunto Ambit Review
“Where am I going? Where have I been? How long did it take to me get there? What was my pace? Did I slow down in that one spot? Is my heart rate high? Am I going South?” These are just a sampling of the questions you may ask yourself while being active outside. If you happen to be so inclined to want to know the answers to these (and more) in real time, you are in luck.
Over the past several years, GPS running watches have become the weapon of choice when tracking speed and distance. These devices work great for most standard distance road races, 50ks, and up to 1/2 Ironman, but (in most cases) extend over the 8-hour time frame and you will be without a timing device, wearing a second backup watch, or taping a battery to your arm to charge the thing up on the go. Now, add in the trail and mountain running side of things where we want to see real vertical gain or may be in a location deep in the woods with no clear view of the sky and very quickly GPS goes from being a great tool to becoming another thing to have to worry about or deal with during the run.
Enter the new generation of location based devices specifically for the those who are “Bound to cover a little more ground.” The Suunto Ambit ($500) may not be an ultrarunning specific watch, but to my knowledge its the closest so far. With rugged design, altitude via barometric pressure, an accelerometer to smooth out lost signal, digital 3D Compass, up to a 50-hour battery, and all the other standard functions you have come to expect from this type of watch, this device can take you from sun up to sun down and beyond.
Below we will take a look at the Ambit in two parts. The first will cover the device itself. The second will focus on how we manage the device and the data we capture on it by looking at the companion training site from Suunto, Movescount.com.
For your reference, I have also included links to some of my workouts using the Ambit during my testing:
- My Member page – https://www.movescount.com/
members/travisliles - Road run – https://www.movescount.com/
moves/move4668378 - Trail Run – https://www.movescount.com/
moves/move5114262 - Hill Workout – https://www.movescount.com/
moves/move4685941
Suunto Ambit Review Transcript
Wrist-top GPSs have generally failed the ultrarunning, mountain running, and trail running community on three points: battery life, climb in terms of altitude, and accuracy. The Suunto Ambit tries to address all three of those. It does the battery by enabling two things.
 Battery Life
You have two battery ratings that come on the Ambit. The first is a 50-hour rating. That is the slower sample rating; we’re not going out and checking satellite all the time. We check once every minute to determine where that’s at. So if you think about hiking or slow moving activity or a straight path, that’s probably going to serve its purpose. In terms of running, which is what we’re talking about today, we’re going to want something a lot faster so we can check on things like real-time pace and distance and be more accurate with it. So the Ambit has the ability to go out and check every second. In that mode, we still get 15 hours. In terms of my testing, I was actually able to get 18.5 hours and around 120 miles of training in that time period with only plugging the watch in to do data transfer. So that’s a lot time and should really get you through anything up to a 100k and for the fast, fast runners out there, you can get through a 100 miler also.
Accuracy and Altitude
Another place where accuracy comes in is that the watch has an accelerometer on it. So it understands movement outside of just GPS. So if you’re in a densely forested area, or you’re downtown in a city with lots of buildings, you’re deep in a canyon and that signal is bouncing around, the watch will try to smooth out that signal by using that accelerometer of that movement and pairing that up with your GPS reading. So you have a more accurate way of doing that when signal is lost.
In terms of climb and altitude, the watch as an altimeter built in, so it’s using barometric pressure, not just GPS data to figure that out. So you match all those things together and you have a much more accurate device that’s targeted at that outdoor person doing things in the mountains, doing things in climbing, and being on your feet or bike or whatever it is that you’re on for a long period of time. So with those things in mind, first, we’re going to get up close and look at the watch in detail and then we’re going to take a look at the software side, which is also important for wrist-top GPSs.
Setup
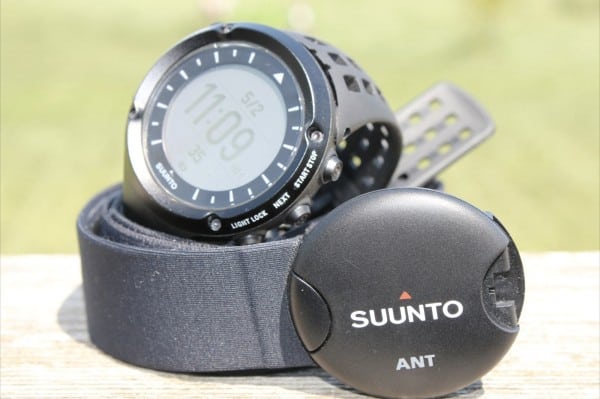
Here we have the kit that comes with the Ambit. So you have the device, if you get the heart rate feature it will come with this heart rate monitor, and then you will get the syncing cable. So just a quick view of how that’s going to hook up. You have four dots on the back, the connectors which are going to connect with this part of the watch, and of course the USB port that will connect to the computer. You’re just going to clip this on and that’s going to transfer the data. This isn’t the most secure way of being able to transfer that. I’ve had that kind of fall out and some things like that, but once you get it and kind of figure out the best way to sit it on your desk, it does just fine. The good side of this is that you don’t have a hole anywhere on the device where water or something like that can sink into. So even though this is a little trickier than a standard USB plug-in, you do have the benefit of having more of a sealed unit.

Screen
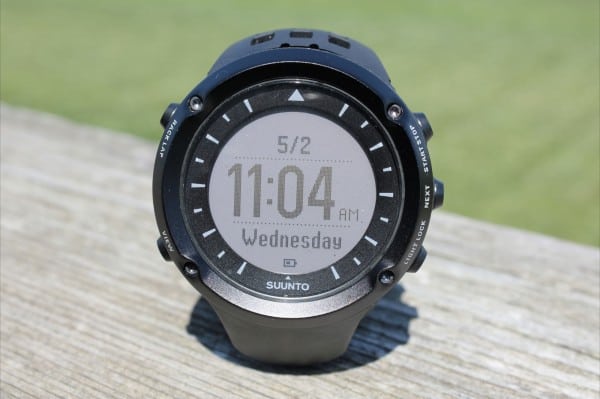
So let’s take a look at the face of the Ambit. What we notice is, I have the black unit here. It is a relatively thick device in terms of a normal watch. However, with GPS devices, it’s not that far off size-wise from what you’ve seen in other places. So just real quickly to give you a comparison, here it is beside the Suunto T6c. So not a major difference in the size of these two devices, but it is slightly thicker. Of course you have a GPS inside the Ambit where you don’t in the T6c. So obviously that’s going to make up some difference there. So then to give you just another example of a very thin watch, here’s an Ironman Sleek beside that just to give you a look from the size perspective of what’s different. On the face of the watch you’re going to have the dials all around it. At the bottom you have your “View” which changes what you have in terms of day or time or seconds, that sort of thing. You can also hold that button down and switch over to the negative so you can have light background with dark numbers or dark background with light numbers, so whichever you choose. You have your “Back/Lap” button over here on the top left. And then on the right side, you’re going to have “Start/Stop,” “Mode/Next View,” and your “Light/Lock” here at the bottom.
Using the Ambit
So to start an exercise, it’s actually pretty simple. You’re going to hit “Start” and this is going to bring up your screen for what you’re going to do. From here you can choose “Exercise,” “Navigation,” or “Previous.” “Previous” is going to let you go back through your previous log of exercises. We’re going to go ahead and hit “Exercise” and “Next” and it’s going to ask you what you want to do. I’m going to show you how to navigate and adjust and modify all these settings because this is something I’ve done for myself here. So I’ve got “Cycling,” “Trail running,” and “Running.” We’re just going to choose “Up/Down” with our things on the side and then “Next.” It’s going to say “Start with the heart belt” or “Start without.” We can say “Start without,” or we can also turn that off. Then “Start with GPS” or “Start without GPS.” And that’s the basic way of getting into an exercise. Once the GPS is found, as it just was, what we’re going to have is our watch, which is what we want, in front of us. When we want to change the way that looks we can actually go to “Next” and get different types of views based off of that. So we can have up to eight different screens per exercise. So as we move through that we have different ones that I have set up and can change based on what you’re doing. There are also going to be different screens based on different sports. Trail running is going to be more about climbing, vertical speed, distance. Running (road) is going to be more about pace, distance, and splits. All that is configurable but those are some of the out of box options you’re going to get.
The GPS antenna sits right here, and you can see on this side of the outside of the watch, we don’t have that. It’s going to sit here; that’s going to sit on the top of your wrist, and give it its most clear view of the sky. You have a nice band here that is relatively thick. It feels like it’s going to be nice and durable. Metal on our clasp here. The bezel is metal. These buttons feel like they’re nice to the touch and give good tactile feedback. Then overall, you have a device that doesn’t have any seams as I mentioned earlier. So it’s a much, much more sealed unit in terms of what you’re getting. So it’s tough to go out and show what a GPS watch looks like without having a bumpy video. I’ve put this through the ringer, lots of different things, hill repeats, road running, trail running, hiking. What we’re going to do now is move over to the software piece.
Movescount
And what we’re looking at here is the Movescount client. This runs in your system tray; this is on a PC but is also Mac compatible. It will synchronize when you plug in the watch via USB. Then this client is going to come up and download from the device and do a couple of other things, move those up, and then synchronize your moves. So in Movescount, any activity you do is considered a “move.” So trail running, hiking, climbing, kayaking, whatever it is you were wearing this watch for, that’s considered a move and then uploaded to the Movescount website. So what we have now is the watched plugged in. We can see the nice feature of “fully charged” which is an indicator that tells us how much battery is left. Then we can go out and check out our moves in Movescount. So let’s go do that now.
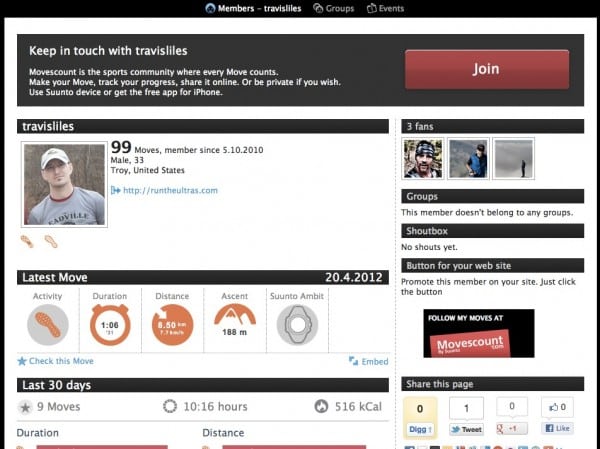
What we’re on now is the “private view” of our Movescount dashboard. This gives us some idea of all of our training and everything that we’ve done with this device and uploaded directly to Movescount. So here we can see a little information about me; a profile; we can see the latest moves that have gone on; the last 30 days; anything that we’ve uploaded with this watch. We have some social aspects here so any other runners or individuals that we follow, we can keep track of if we want to, and then events or groups that we belong to as well. So we can add moves on our own or we can look at the ones that have been uploaded from the device.
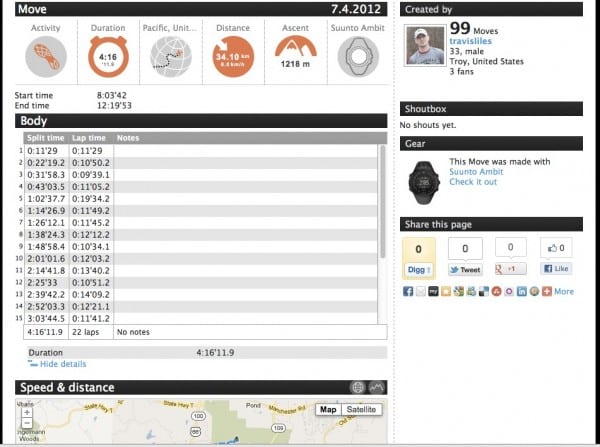
Here’s my latest move while wearing the Ambit. We’ll go in and look at some of the data that we get kicked out from the watch. So first off, when you start the watch, you choose what kind of activity you’re going to do. This one was “trail running.” When you do trail running, the views are different on the watch and it gives us things like “ascent” and “climbing speed” and those sort of things. So what we have is “trail running” in 1:06:30, we have a route on that because I had GPS on, we have distance, we have the ascent, and the device. I can export this move, I can edit, I can do some things with it, if I stood around or whatever, I have some editing capabilities. This gives us some information: total time, number of laps. Of course, if we were running a road run where we wanted every mile split, every 1/2 mile split, every kilometer, however we wanted that data split, that would show up here and we’d have that data available to us also. This is the map that came out of it, the trail run that I did, lots of blue lines here. It was actually hill repeats that I did, so there will be a lot of activity that went on in this specific place. So we get our output from our map. When we look at this chart below, little additional features that we get, we can see speed (maybe general running, maybe I stopped to tie my shoe), and then my hill repeats that happened. We can also see altitude. So because this has an altimeter in it, measures barometric pressure, we have some ability to have some very accurate data coming from that. I’m a flatlander, as you can see, but this was the hill that I did and we were able to get some information back from that. Temperature (here) we can also graph, distance (here), and vertical speed (here), which is a fun one. This is because of the altimeter that is built in there along with the GPS, we can do some math to figure out how quickly are you climbing up something. So this gives us an example of how fast we were able to go up that grade, going up at that speed. Then at the bottom, here, we can get additional details. What’s nice about this is the amount of content. This is specific to running, mountain climbing, hiking, whatever you want to do. All of this can have some different types of data that is intelligent to this or riding a bike. We just happen to be trail specific for this. So we can get some information, max speed, all the types of information you’d expect to pull from a GPS type device, we’re able to get through our Movescount dashboard.
If we look over here on our right hand side, we can see our calendar. One of the nice features about this that I liked was the ability to roll up all the activities that I had done. So here’s one specific activity that I did, and now I want to look at multiple activities. So I’m going to deselect the first one and I’m going to grab this one and this one and this whole first week. We can see this does a really great job of building out on the week all of activities that happened. So we can see 8 moves. I did 8 activities wearing this watch. I had a 74-mile week with 42 of those “running” and 32 of those miles “trail running.” I can get splits based off of that; I can get ascent between the two based off of what was going on. Then I can see my max speed and my average speed between those. Also, when wearing the heart rate monitor, I can get a break down of my heart rate that happened within that. So I can see the amount of time that I did that. I don’t wear a heart rate monitor for every workout, but when I did, I can get that. Then we have some other charts and graphs we can go to. So all the things that are tracked through our watch we’re able to display on here. This is duration, by day, we can see a 4:45 run on the 1st and then 1:10 and so on. Then we also have some graphs on “feeling” or how he felt. If you want to have that, we can adjust “felt good,” “felt bad,” “injured.” So we can run those sort of things through and all types of different metrics that we want to look at and see how we did. Peak Training Effect is a good one basically showing how did I improve on this one vs. the last one. Was I just running in zone 3 all the time? Did I get some good recovery? Did I run in a high zone 4 and really do a lot of high anaerobic output? Am I increasing my VO2 Max? There are a lot of great ways to go through and get some information on how you’re improving as an individual.
Ambit Settings
Next up, what we’re going to do is look at the settings on the watch. One of the features that I really liked about the Ambit was the ability to change the look and feel of the displays on the watch without having to mess around on the device, this little, itty bitty screen on my wrist. So I can go to this “Gear Tab” and we can see the different types of devices that I have. I have my own personal Suunto T6c and I also have the Ambit. So I can change all my settings here and these are going to automatically sync with the device. “Personal settings,” I can put all my information in there. I can do my “General Settings” of the device. If I want to change the display from light to dark, I click the button, click save, and that’s going to change my watch from being a black face with white numbers to a white face with black numbers. It’s really easy to go through and changes how we go about showing the watch.
Probably for a training standpoint, this is really what I like the best. When you get the watch and you turn it on, you’ve got all these different modes that are enabled by default: alpine skiing, cycling, indoor training, mountaineering, running, trail running, trekking, other. You can add your own also, but these are the default. So for me, when I put this watch on, I’m going to be out running, trail running, or I’m going to hop on my bike. So those are really the only things I want because I don’t want to have to scroll through those different things. So I “Disable” all these others. I can “Delete” if I’d like to or I can just uncheck the box. Then, inside of each of these specific sports, I can edit the way that watch is going to look. So for example, on my “trail running,” I want some different views. I can pick how I want the watch to look: distance, stop watch in the middle, then on the bottom, I’m going to pick my views (ascent, descent, pace, vertical speed). That’s one view. My next view could be time, heart rate, and average heart rate, peak training effect, vertical speed. As you can see, I can have more and more and more displays. That’s going to deploy that directly to the device when it’s plugged in over the USB. So this is a really great way of being able to manage the device without having to mess around with all the buttons, and it’s going to simply sync to that watch and it will be available the next time you turn it on. So I found this to be a really great way to manipulate the watch, work with it, and it’s a really easy way to interface directly through the Movescount.
Waypoints
At the bottom here, waypoints. If we want to add waypoints, we can do that on the device itself or we can create a new waypoint by basically going in and adding what we want to add to it. Those again will deploy to the watch, or if they’re already on there, they’ll sync back and forth. So if you’re trying to do geo-caching or something along those lines with the watch, or if you’re trying to remember where the trailhead is if you’re going somewhere new, this is a great way to manage and keep track of those things. So that’s the overview for the software for the Suunto Ambit which is the website, “Movescount.com.”
Overall Impression
The Suunto Ambit has definitely upped the game in terms of outdoor, rugged GPS running watch. This device is aimed at those that are out there doing mountain sports, climbing, that are in bad weather, that are in somewhere that the device can really take a beating, along with providing great data from things like GPS, having a long battery life, being able to accurately track vertical gain, as well as some things we weren’t able to get into like a digital compass just to let you know where you are. So all in all, you’ve got a device definitely targeted at us as ultra runners, spending a lot of time on our feet in maybe not the best of conditions. With that, any questions or comments, leave those below the video. Thanks for watching. We’ll catch you next time.


