 Low back pain is among the most common and persistent pains among humanity. Runners are not immune to low back pain, defined here as any pain in the lumbar spine area, just above the hips and pelvis. In fact, running can be an irritant to the lumbar spine, making it prone to pain with simple, daily activities such as sitting, standing, walking, bending, and reaching.
A primary driver of running-induced low back pain is compression. With running, the lumbar-sacrum-pelvis area absorbs and processes a lot of energy with each landing and push-off.
If the stride is inefficient — in posture or propulsion — the low back area may absorb that energy through compression. This happens via a reduction of the space and extensibility of bones, connective tissue, and muscles. This loss of motion is a prime reason for both back stiffness and pain.
And while it seems straightforward that simply stretching the low back itself should relieve pain, it often requires more effort and attention to the system around it, including the thoracic spine, sacrum, pelvis, and hips.
Thus, treating only the painful area seldom results in complete or sustained pain relief. A physiotherapist or chiropractor may manipulate your back and generate an impressive pop — with pain relief and restored motion — but if that improvement regresses days or hours later, it is often due to untreated stiffness above and below the low back.
Mobilizing these surrounding areas will provide the lumbar bones and tissues room to decompress and move normally, often without aggressive direct treatment strategies.
I want to show you how to do that, yourself.
Lastly, many of these strategies employ the concept of traction. Traction is a lengthening and gapping strategy that increases the space between structures, and it’s the opposite of compression. Traction-based stretches generate the most range of motion with the least amount of strain, pressure, and pain.
The Decompression Progression
I outline these self-treatment steps in order of least to most aggressive. If you currently experience acute low back pain where any movement is very painful:
- Seek an in-person medical consult to determine your back is safe to move; and then
- Proceed with caution, gentleness, and patience with the following progression.
Step 1: Thorax Foam Rolling
The thoracic spine is a silent culprit in low back pain and dysfunction. Interestingly, the thoracic spine and rib cage can be incredibly stiff but asymptomatic for many. However, the stiffer the thorax, the more stress is transmitted to the low back.
To mobilize the thorax, I like to perform the following strategies. All should be performed on a 36-inch foam roller:
Side-to-Side Rolling
This is the most gentle, first step, rolling side to side on the rib cage. If possible, flatten your lumbar spine on the foam roller.
Roll side to side for one to five minutes.
The author demonstrates side-to-side foam rolling. All photos: iRunFar/Joe Uhan
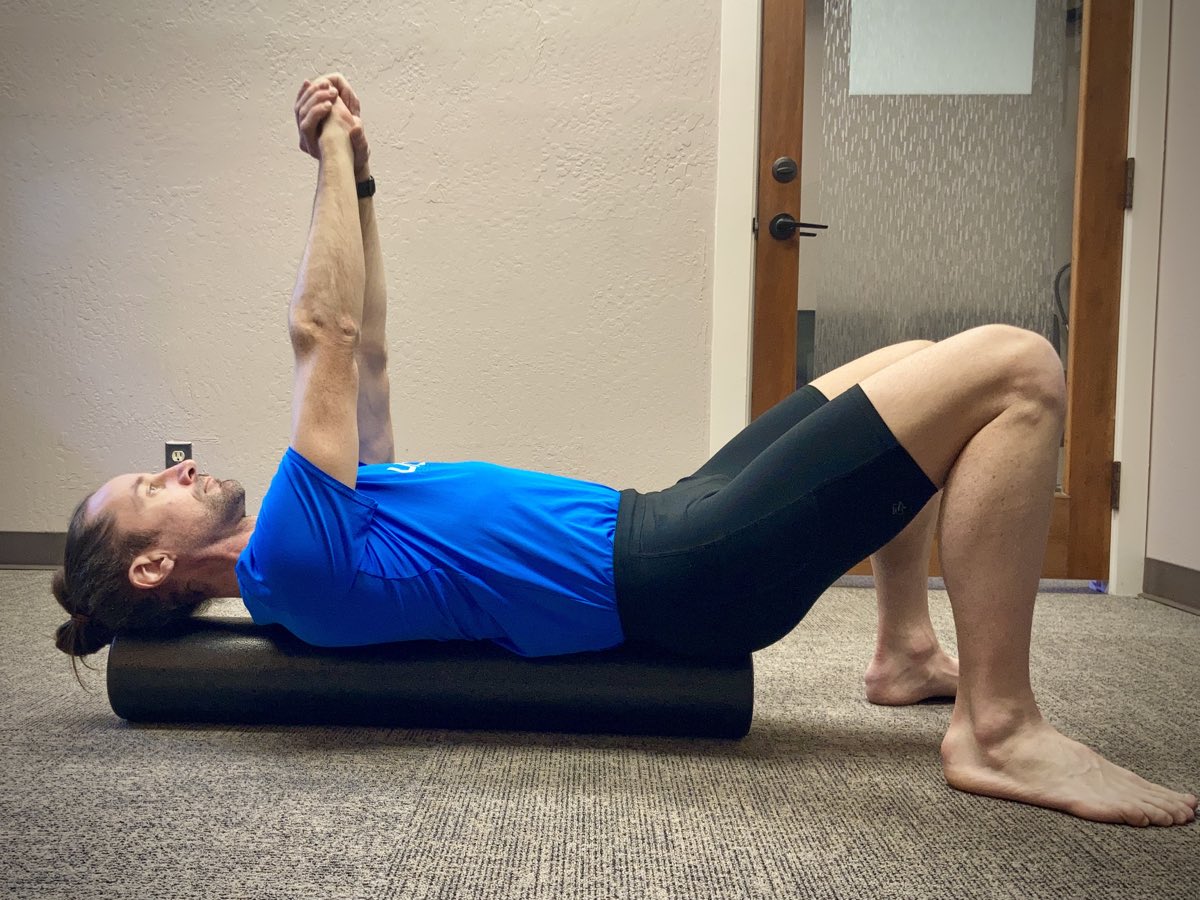
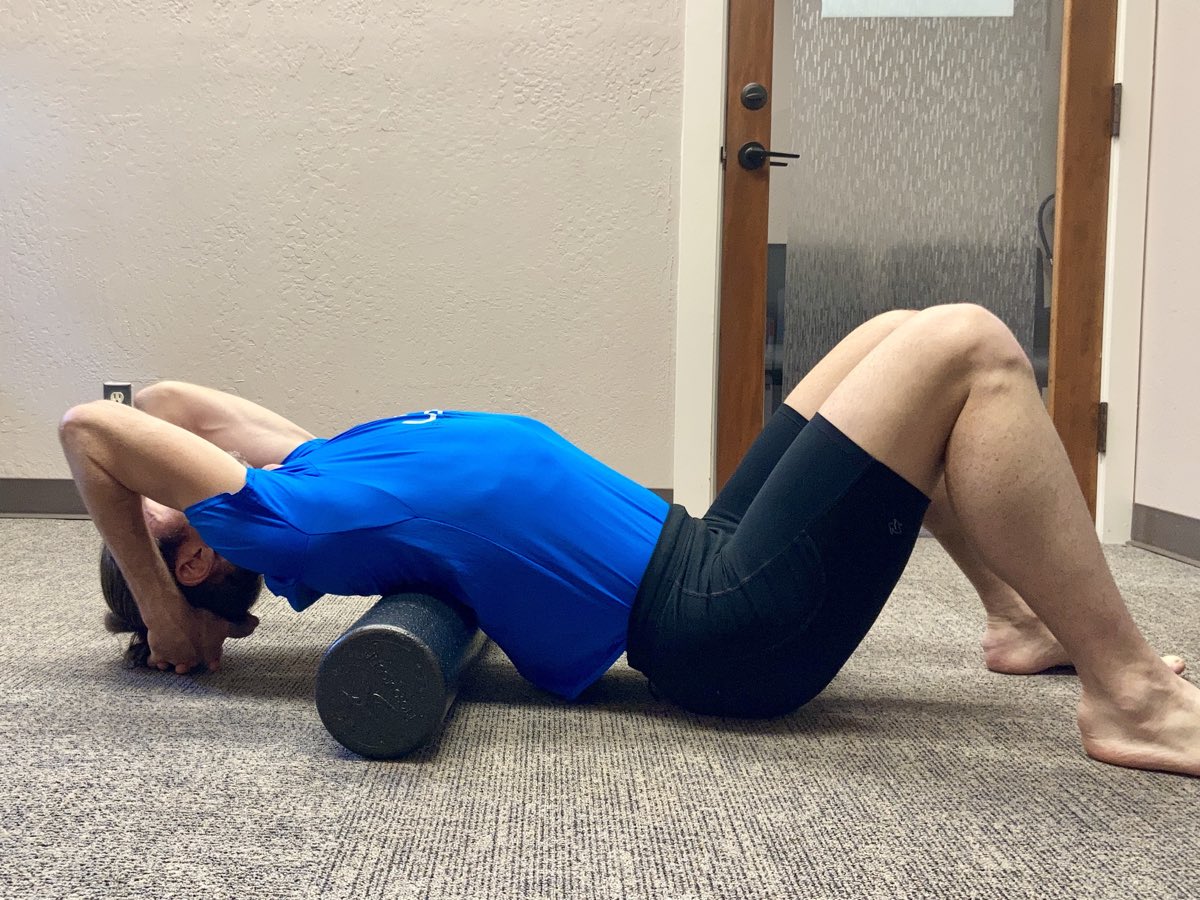
Up-and-Down Rolling
Position the foam roller at your mid-thorax, just below the shoulder blades. Always support your head in your hands. Position your body parallel to the floor. Before rolling, flatten your low back and engage your abdominals. This protects the lumbar area from too much arching. Roll from the base of your neck to the bottom of the rib cage. Avoid rolling directly on the low back!
Roll up and down for one to two minutes.
Up-and-down foam rolling.
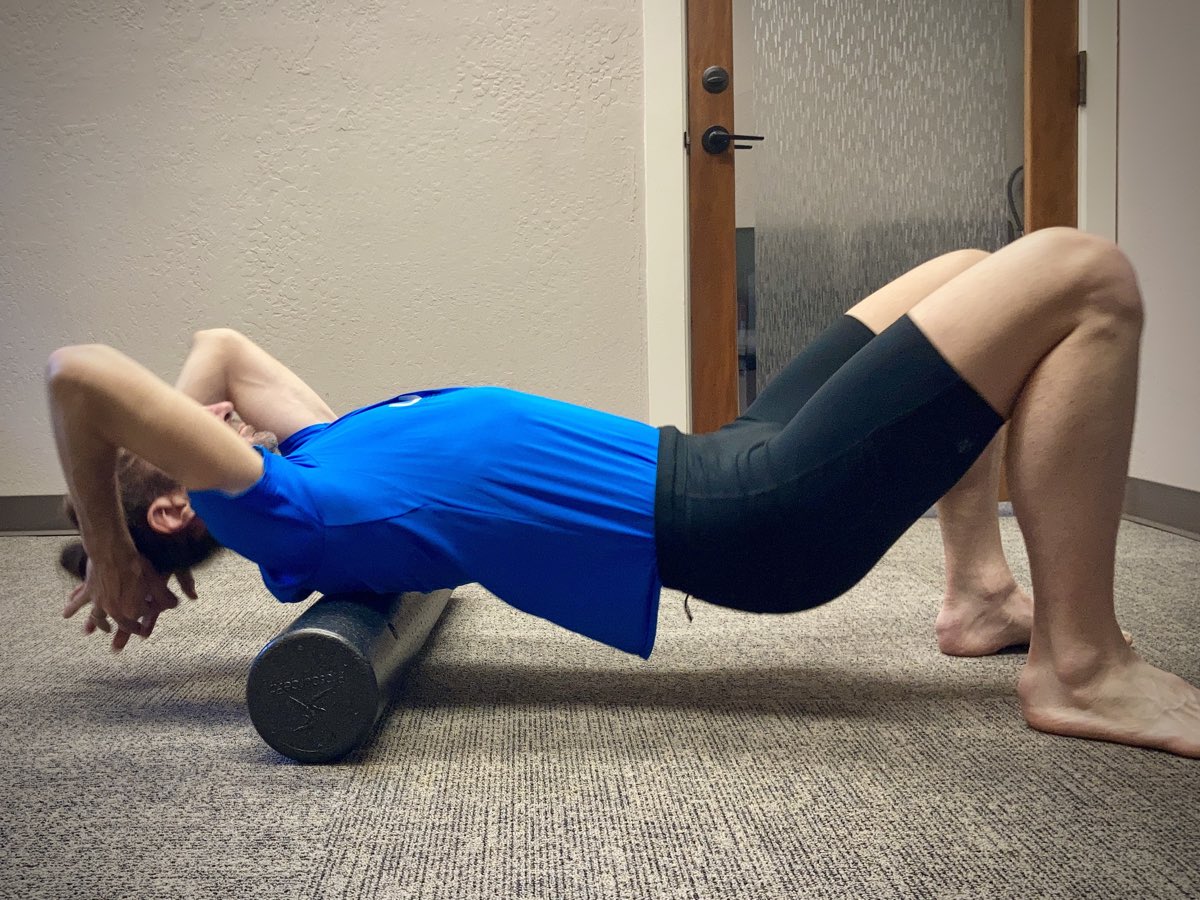
Arch-Over Rolling
Pick a stiff spot somewhere in the rib cage and position the foam roller on that spot. Allow your pelvis to sink toward the floor, and then lower the head into the hands.
Take two to three breaths, and then lift and roll again. Find another spot to repeat, as needed.
Arch-over foam rolling.
Diagonal Rolling
This may feel awkward, but it promotes thoracic rotation. Lay on the foam roller as you did for the Up-and-Down Rolling above, but with the roll angled at about 30 degrees.
Without arching over, roll up and down for one to two minutes, and then switch to the other diagonal.
Read this thoracic mobility article to learn more.
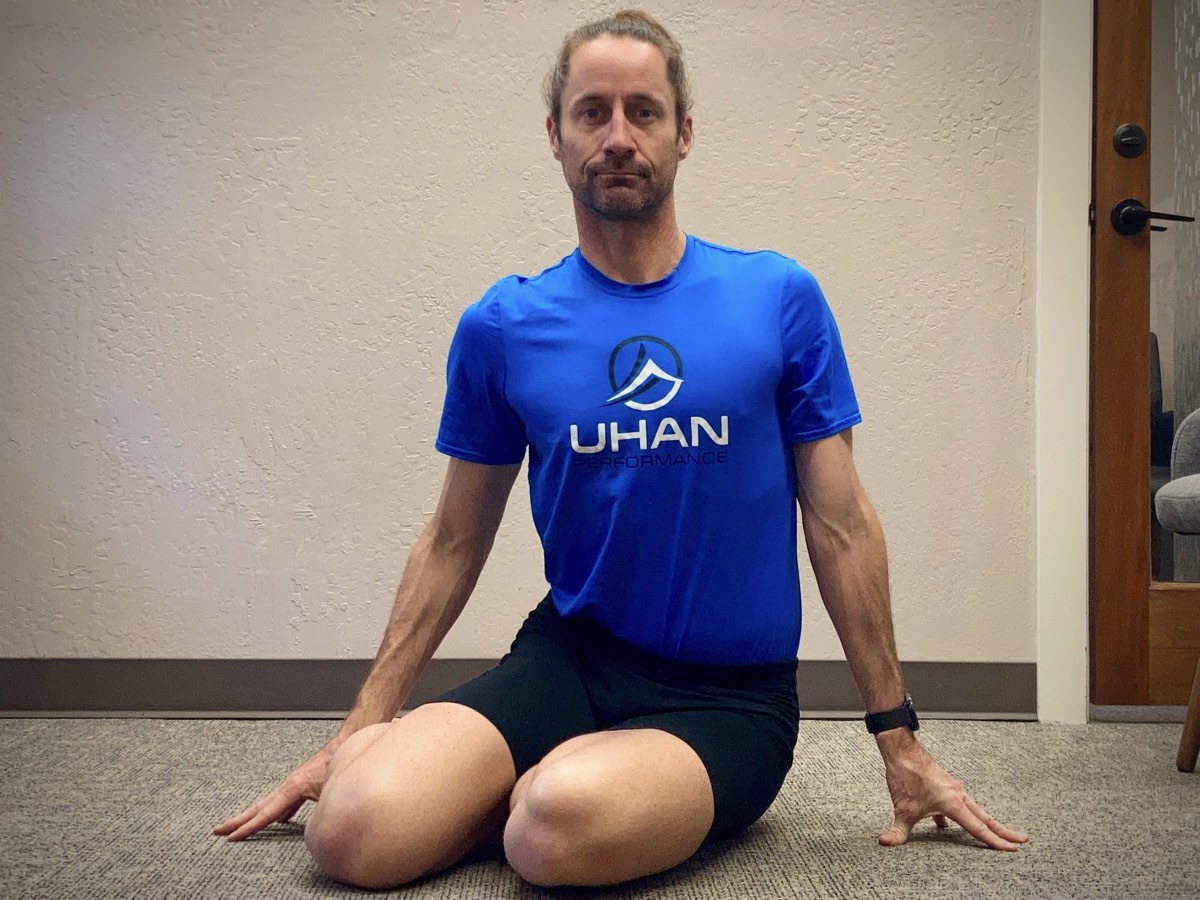
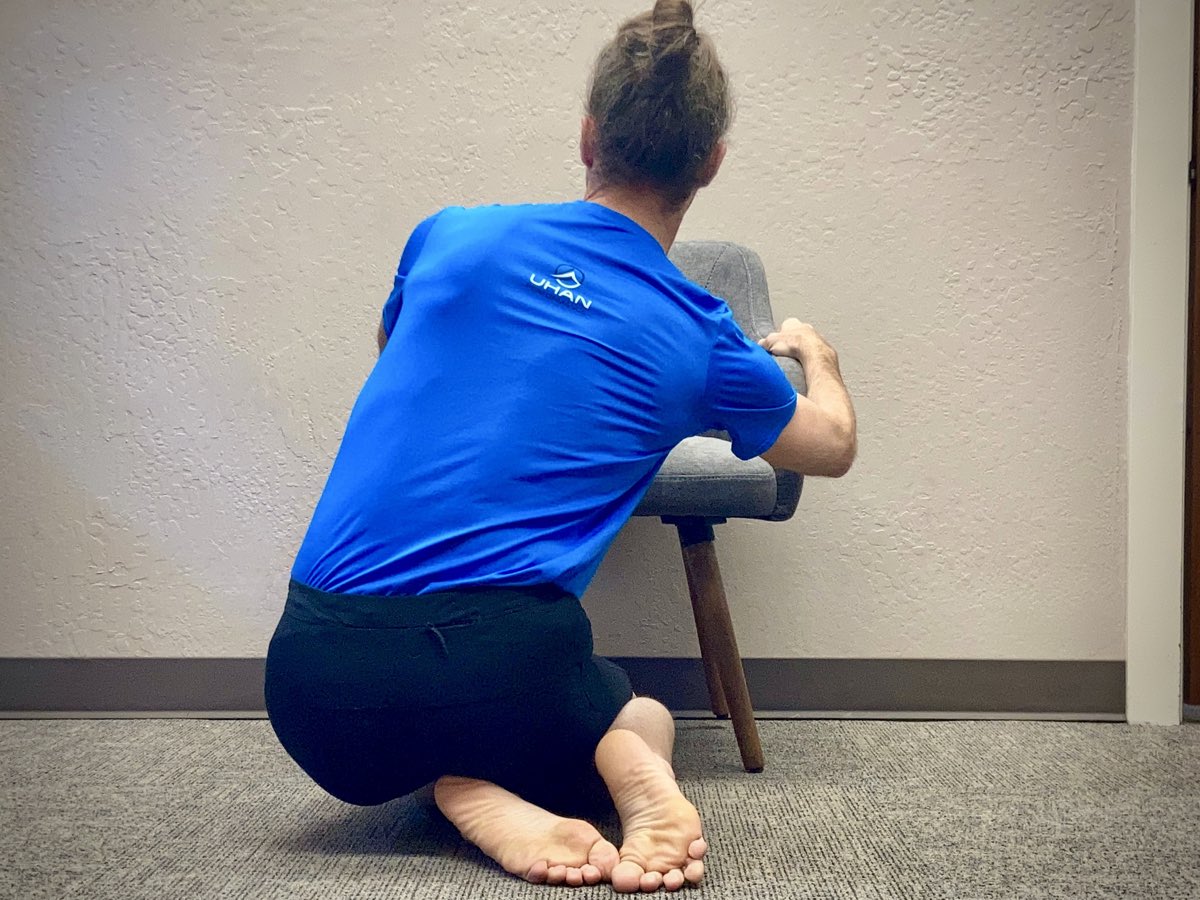
Step 2: Pelvis Boogie Board Stretch
The next step is to decompress the pelvis and sacrum away from the lumbar spine. A great strategy is to stretch the lateral pelvis using the boogie board stretch.
To perform, sit on your heels, with a chair, couch, or wall in front of you to hold on to, for balance and control. Carefully sit off to one side. For example, to stretch the left side, the right buttocks sitting on the left heel, and the left buttocks endeavoring to touch the floor. Often, if you’re stiff, you will be unable to do so. Hold onto something to modulate the stretch intensity. Repeat on the other side.
A front view of the boogie board stretch.
To increase the stretch, consider adding an ipsilateral rotation. For example, if sitting off to the left, turn your rib cage and head farther left.
Perform bouts of 15 to 30 seconds, several times per side, until you get closer to being able to sit with one cheek on the ground.
Alternatively, if your knees and hips won’t tolerate deep kneeling, try a standing side bend. Cross the stretch leg behind the other, and then bend away from the stretch side pelvis. Fine-tune the stretch with small flexion (forward bending) or extension (back bending) motions. Repeat on the other side.
We discuss this concept in greater depth in this article about the importance of pelvic mobility for running efficiency.
A rear view of the boogie board stretch.
Step 3: Child’s Pose
This may look basic, but a well-executed child’s pose yoga stretch utilizes traction through not just the spine, but also the sacrum and pelvis.
To perform, begin by kneeling, and then sit back and bow forward. Position your knees in any position that is most comfortable for knee and hip flexion.
For the traction effect, the hands should be outstretched in front of you, gripping the floor with the whole hand. Anchor your hands and sit back farther. This creates a strong, decompressive traction force in the low back area.
Hold this position for three to five breaths. Try three to 10 repetitions. Note that the knees and hips often need rest, more frequently, than the back.

Child’s pose yoga stretch.
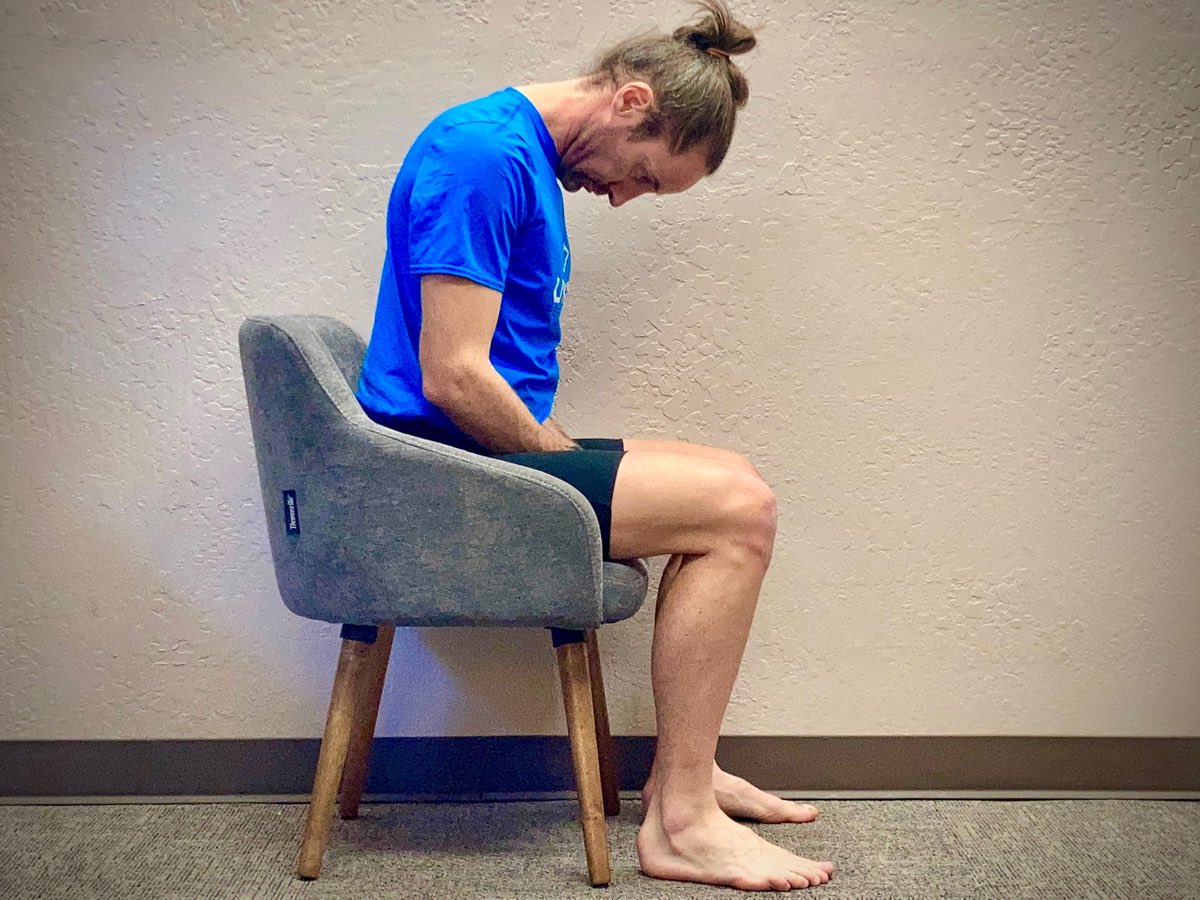
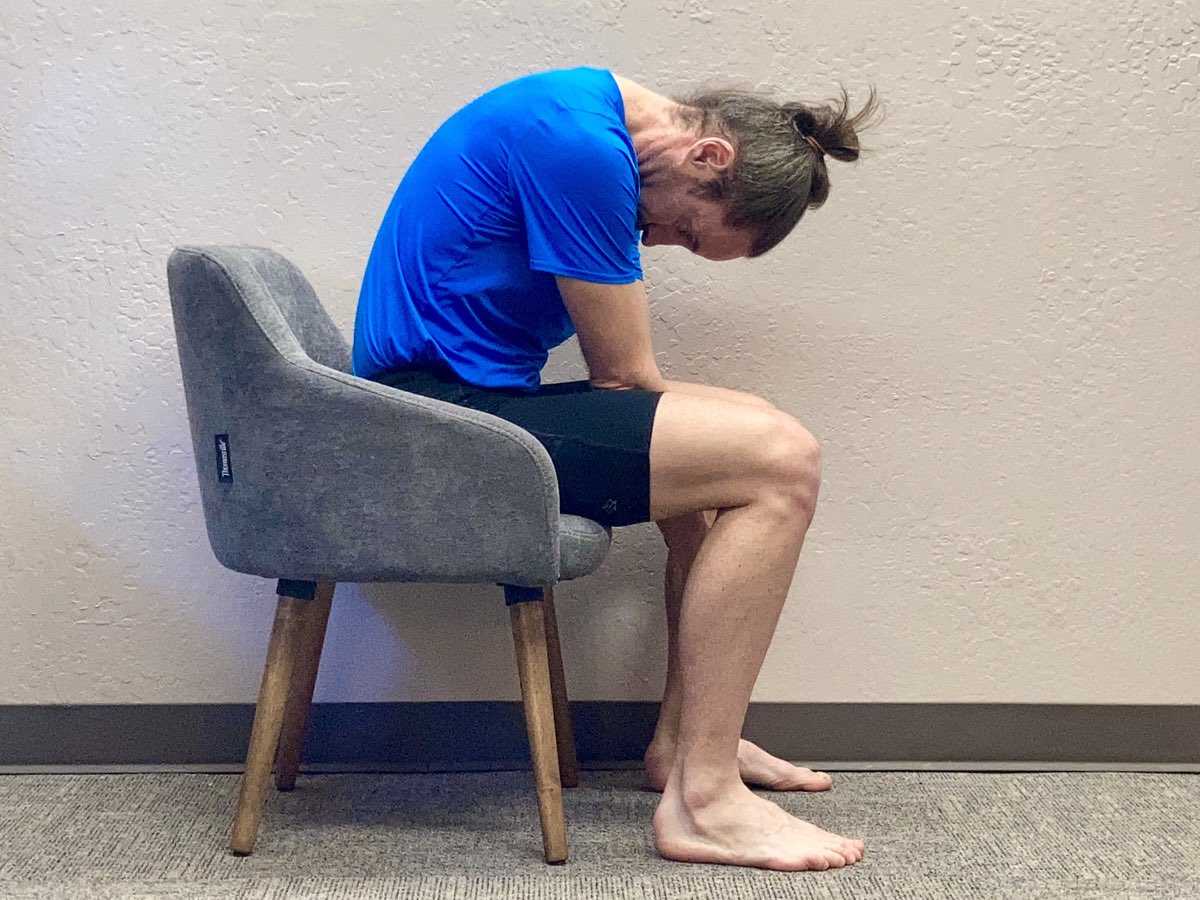
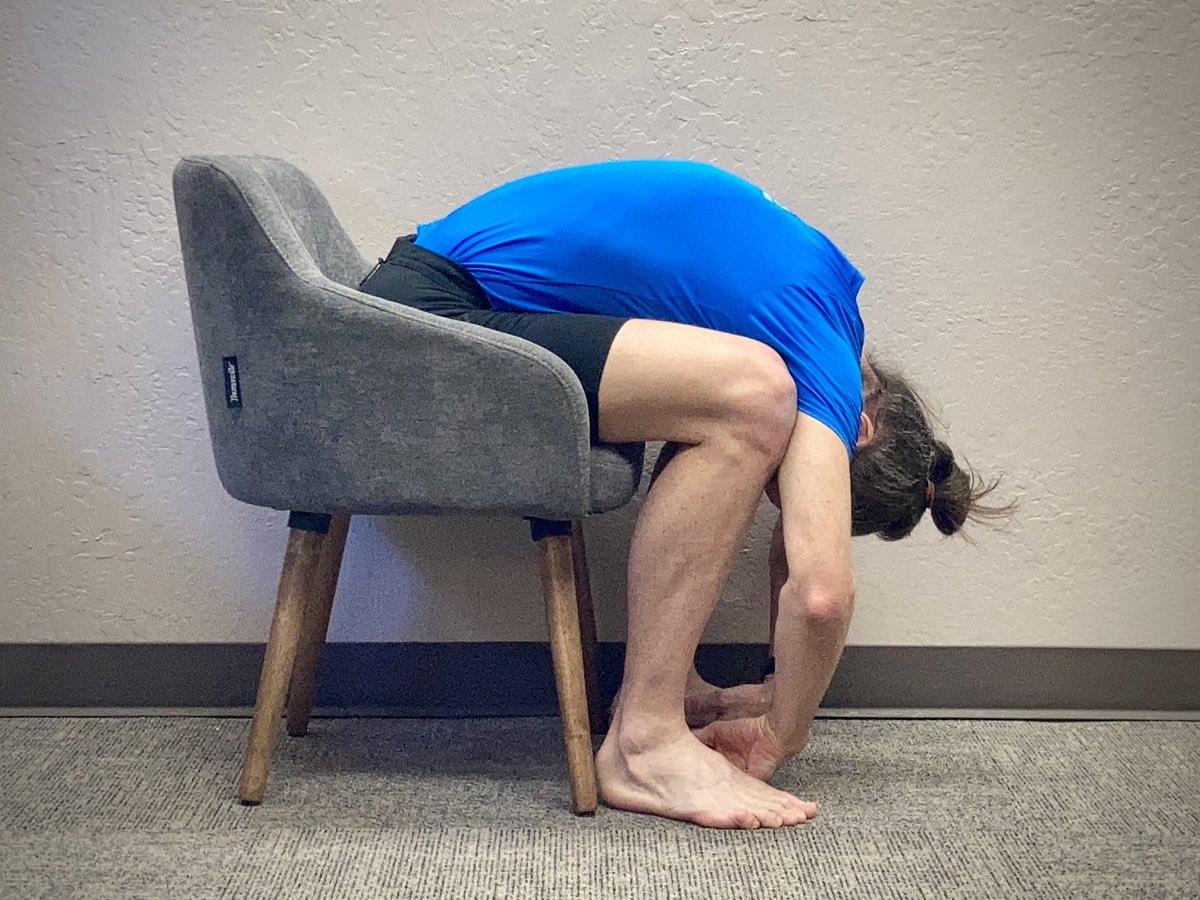
Step 4: Seated Toe Touch
Many low back pain sufferers fear flexion because that motion hurts. And while it may have been painful, for many it is not the actual cause of pain. If your pain is no longer acute or severe — and the child’s pose in step 3 was tolerable — the next step is to try the seated toe touch.
In addition to another traction-based stretch, the seated toe touch also facilitates segmental mobility, or the ability to move each spinal bone, one at a time.
To perform, sit in a chair, with the feet and knees wide. Slowly flex segmentally: chin tuck, and then neck flex, followed by the rib cage, and then the low back, as the hands slowly reach the floor.
Hold this position for one to three breaths. For additional stretch intensity, grab beneath the feet and pull with the hands. This adds traction force on the spine.
To return, segmentally extend from the bottom up: pushing the sacrum, and then the lumbar bones, rearward and slowly rolling back up to a seated position. Repeat three to 10 times.
Seated toe touch part 1.
Seated toe touch part 2.
Seated toe touch part 3.
Step 5: Runner’s Lunge
Moving beyond the pelvis and sacrum, improving hip mobility is crucial to decrease strain on the lumbar spine. A major culprit in lumbar compression is tight hip flexors, particularly the psoas, which originate on the lumbar spine before connecting to the femur. Moreover, tight hip flexors can pull the lumbar vertebrae slightly anterior, preventing efficient movement, as well as pulling the pelvis downward into a rigid and compressive anterior tilt.
Because the psoas can so easily pull on the low back, the key to stretching it — without further compressing and irritating the lumbar spine — is to always have the non-stretched leg in full flexion. This locks the lumbar spine in neutral while also accentuating the stretch effect, in the running position.
To perform, place the forward, flexed leg on an elevated, sturdy object, like a chair, a bench, or two stairs on a staircase. Position the rear, stretch leg behind, wide and internally rotated. Allow the whole body to sink down toward the floor, while maintaining a straight knee in the rearward leg.
Hold this position for 15 to 30 seconds and repeat four to six times per side.

A side view of the runner’s lunge stretch.
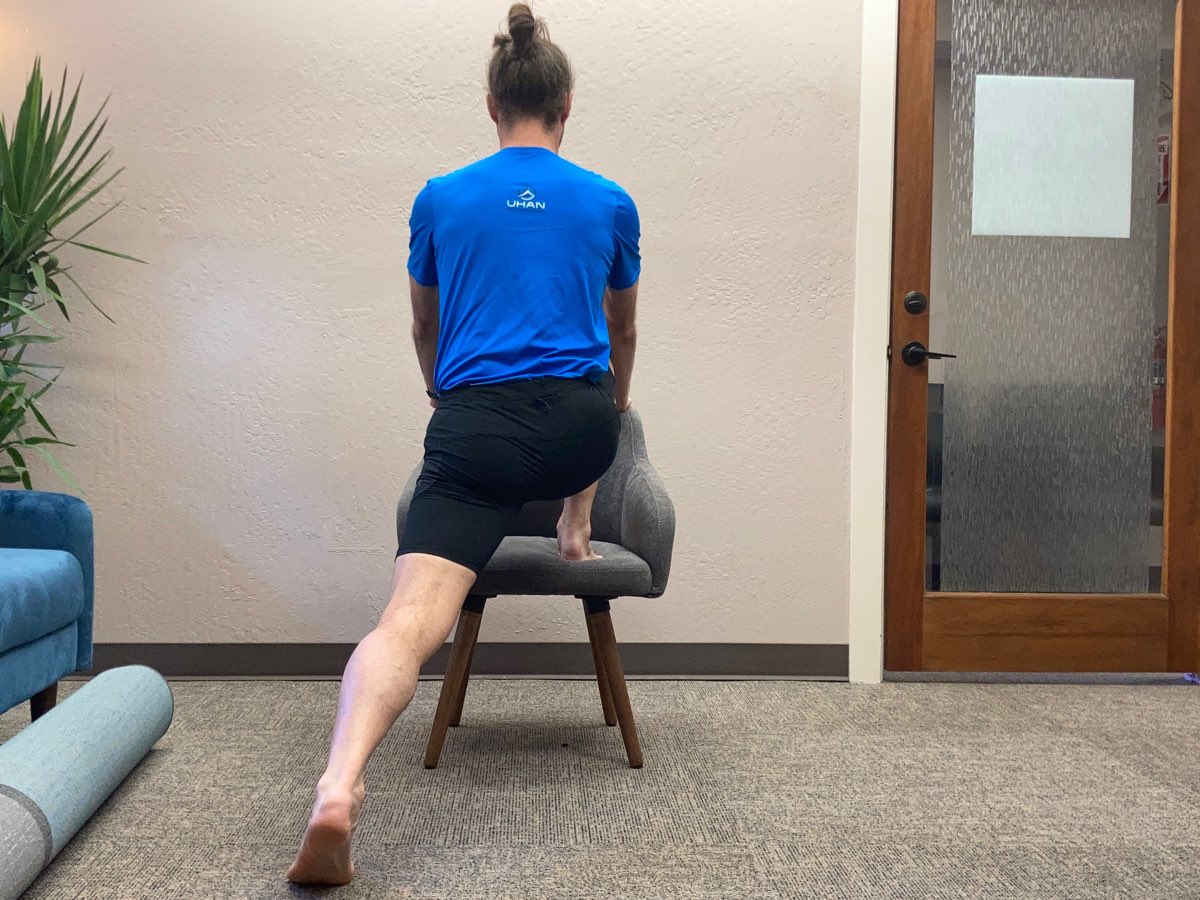
A rear view of the runner’s lunge stretch.
Step 6: Trunk Rotation
Spinal rotation can be a provocative stretch to an already irritated low back. But if preceded by the stretches above, a trunk rotation stretch can free up the low back, as well as the areas above (thoracic spine) and below (pelvis and hips).
Additionally, many runners experience a sort of false low back and hip pain that originates from the lower thoracic spine. The superior cluneal nerves are two sets of sensory nerves that originate from the thoracolumbar junction — between the rib cage and the upper lumbar spine — and travel down and toward each buttock. If this junction gets stiff, those nerves can be sensitized and cause lumbar, pelvis, or hip pain.
The best way to prevent cluneal nerve irritation is to stretch into rotation. To perform this stretch: begin on the ground, flat on your back. Flex the stretch knee to your waist, then fold it across the body. Using the opposite hand, push the stretch knee toward the floor.
Hold this position or oscillate with on-off pressure. Hold for 15 to 30 seconds, and repeat four to six times per side.
Note that if this stretch causes sharp or grabbing pain, do not perform. Continue with the other stretches, and wait a few days before trying again.
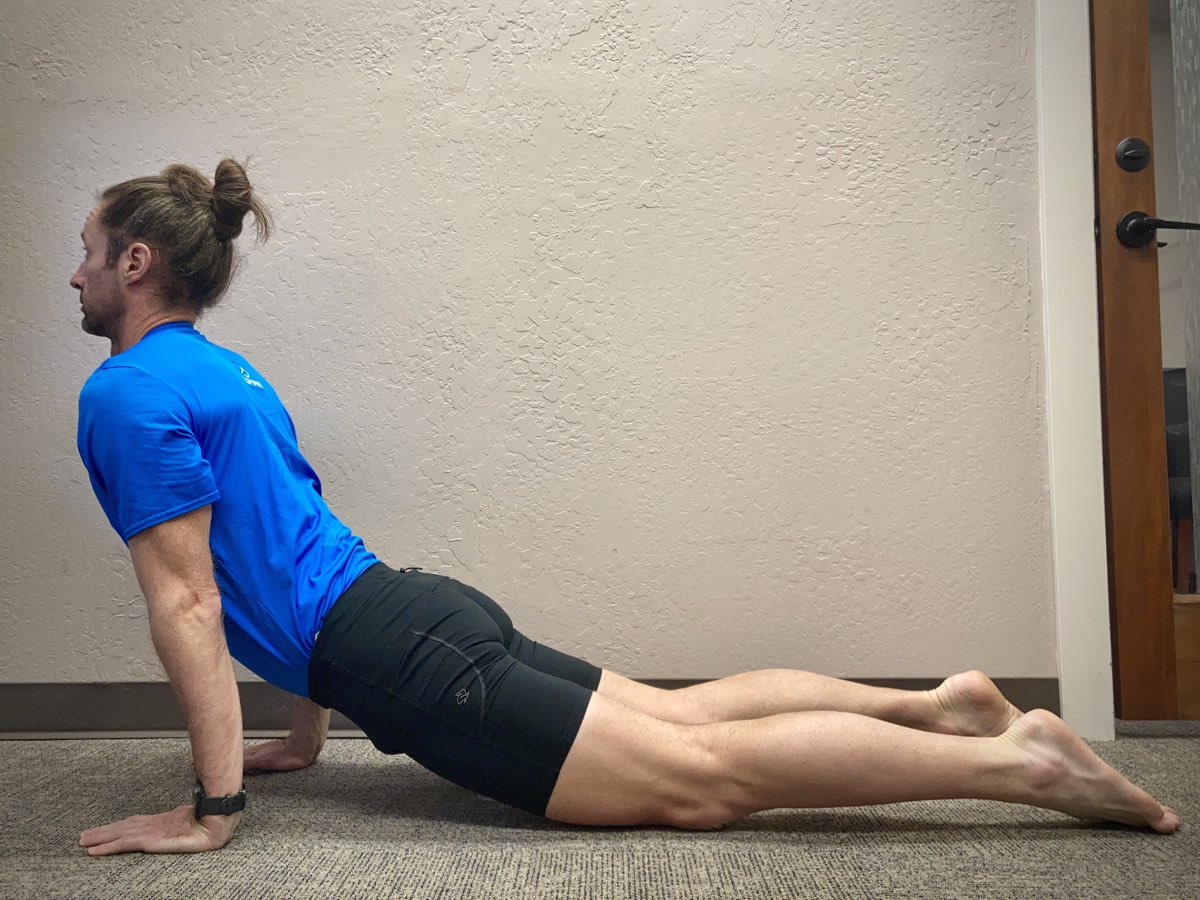
Step 7: Upward Dog
An upward dog yoga stretch — or prone press-up — can be a provocative stretch to many runners’ low backs, even if they are not currently experiencing pain. Done without traction, a prone press-up tends to increase lumbar compression. Such force doesn’t feel good and often produces — or worsens — lumbar pain.
However, when traction is properly applied — and preceded by effective mobility strategies at the thoracic spine, above, and the pelvis and hips, below — the same upward dog motion can be a terrific stretch to improve mobility and decrease pain.
To perform, lie prone on the ground. To properly achieve traction, your hands need to be both close to your torso, as well as somewhat low along it, at the chest level, as opposed to the shoulders.
As you press upward to lift the body, also press behind. The goal is to lightly drag your toes one to two inches. This dragging of the legs creates that decompressive traction force. Continue pushing upward and rearward until the elbows lock or until pain/discomfort limits. Hold for one to two breaths.
To return, you can either return directly to prone, or transition carefully into a child’s pose yoga stretch, which we explain in step 3 above.
Perform five to 10 upward dog yoga stretches.
Upward dog yoga stretch.
Conclusion
Low back pain is complicated to treat because not only are there so many different structures that cause pain, but because adjacent issues — namely stiffness above and below the low back — can feed compressive stress into it. Decompressive strategies are crucial.
Perform this sequence to not only address low back pain in the least provocative way, but also to help prevent its return by keeping all the related parts, mobile!
Call for Comments
- Do you suffer from low back pain?
- Did you find the above helpful?
- Is there anything else that works for you?
