Fastpacking is a brilliant sport. Simply said, it’s a sport where you strap a small amount of gear, food, and water on your back and go running and powerhiking for days at a time. Where you sleep under the stars wherever your feet have landed you. Where you cover big miles and earn even-bigger views. Where you develop and use your abilities in backcountry risk management and navigation in getting to places that would be hard to see in a day or more.
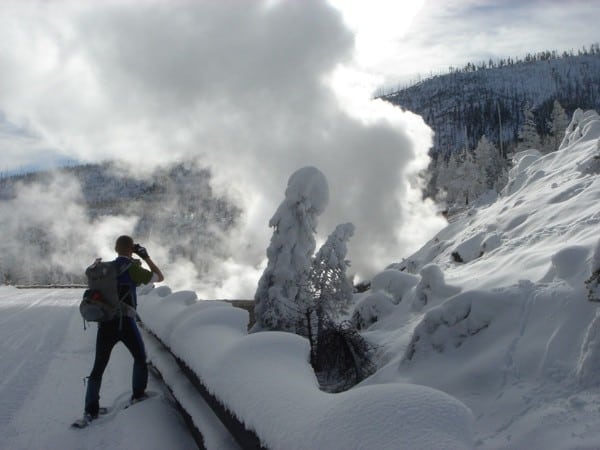
Bryon Powell fastpacking in Yellowstone National Park in winter. All photos iRunFar/Meghan Hicks unless otherwise noted.
The trail and ultrarunning community has talked long and hard in the last 10 years or so about this niche corner of our already-niche sport. Much has been written about athletes embracing multi-day fastpacking, yet we haven’t seen an in-depth how-to for getting it done. What follows is just that, the ins and outs of making fastpacking happen.
I’ve got several thousand backpacking and fastpacking miles and 18 years of experience under my belt. I’ve made a boat load of mistakes and learned a lot along the way. This article, what has turned into a biblical treatment of fastpacking, is my attempt to convey what I’ve learned. I’m not here to endorse products per se–though I’m not shy in telling you about the ones that work best for me–but I am here to endorse a methodology.
That said, there is no single right way to do most things in fastpacking. There are multiple means to the same end. You must test and re-test your own, personal methodology, and adapt your gear and approach through time. However, using this article as a jumping-off point should save you a lot of research, testing, and mistakes. Please enjoy!
My fastpacking methodology aligns with several principles:
- Less is more (except when it’s not) — You’re never going to be able run and cover good distance if you carry too much weight. We’ve got the whole history of backpacking to teach us that more gear isn’t always better. I am a gram counter who cuts unnecessary straps off my pack and tags from my clothing. But there has to be balance here. You need the right gear to take care of yourself, to be prepared for the elements you encounter. Carry exactly what you need to be happy and healthy, and nothing more.
- Occam’s razor — Simple is best. I’m a fan of simple gear, stuff that won’t break. You do not want to be 60 miles from another human being and have a crucial piece of gear go belly up! I’ll sometimes choose an item that’s a bit heavier than the most lightweight option available because it’s more dependable or efficient.
- Put in solid, recoverable efforts — If you’re going out for six days on trail, you need to be just as strong on Day 6 as you were on Day 1. Your route and distance covered should challenge you physically, but you shouldn’t take things to the very edge of your capacity. You’re already traveling ultralight in a remote location, and a good risk manager knows that getting physically extreme in that situation exposes you to even more risk. (In case you’re wondering my thoughts on where and when you can/should push yourself to the edge of your capacity, an ultramarathon with aid stations, course markings, medical support, and other runners is a good place. The backcountry could be a good place to push your limits, but it’s my opinion that you need to have years of experience of controlled efforts in similar situations beforehand.)
- No nonsense — On my gear and planning for backcountry trips, I am 100% no nonsense. Mistakes about either can be life threatening for me and the people I travel with, as well as other folks on the trail and search-and-rescue personnel who might have to help me if I have a problem. Thus, if my tone in the rest of this article is more direct than you’re used to me writing and talking with, don’t be surprised. Also, I don’t give two shits about aesthetics, how something looks while I’m using/wearing it in the backcountry. When you’re a day’s run away from help, it’s only about how something functions.
- Leave No Trace — Familiarize yourself with the seven Leave No Trave principles and how the LNT organization recommends you manifest those principles in the field. Even when you’re tired or wanting to move fast, always, always practice LNT. Simply said, if you can’t move yourself to care for the places through which you travel, you don’t belong in them.
Making a Plan
The point of fastpacking, at least in my mind, is to have a journey to a place you might not be able to get to in just a day, to sleep out under the stars, to become fully immersed in nature, and to experience self-sufficiency and independence. When I plan a fastpacking trip, these goals are my guiding forces.
I once had a mentor who taught me much about the outdoors and saved my heiny in it in more than one instance. One of his sayings is that all great outdoor adventures are won or lost in the planning process. That is, a well-thought-out plan more often than not leads to backcountry success. I’ve learned over the years that there are certain details about a trip that you can leave in limbo and others you should have your ducks in a row about before you head out. Before heading to the backcountry, you should always have your route, partners, approach, emergency plan, and gear sorted.
Route
The first thing to choose is your route. As you plan your destination, think about the climate, terrain, access to water, remoteness, daily mileage, the kind of wildlife that will be along your route, and more. Before committing to a daily-mileage goal, take into account variables like weather, elevation gain and loss, altitude, technicality, and more.
Depending on where you’re headed, you may have to make reservations for a permit or for backcountry campsites, or get them on site when you arrive. In a few cases, there are lotteries for garnering backcountry permits.
It’s your responsibility to know the rules of the wilderness area, national park, national forest, and/or other public land you’re headed to. Do your research ahead of time.
Acquire the appropriate maps for your route, and make sure that the maps include your emergency/alternate exit points. (More on those below.)
Partners
If you’re doing an adventure with others, choosing your partners should happen contemporaneously to the sussing out of your route. Here are a couple factors to consider in choosing your partners:
- Experience — You can venture out with a group containing members of variable experience levels, but you should be 100% aware of your differences, and the trip should be suitable for all the group members. For instance, short fastpacking trips are great opportunities for less-experienced people to learn from those who are more experienced. But if the most-experienced person becomes injured or ill, the trip needs to be of the sort that the less-experienced group members can problem solve within. If you’re headed out on a true expedition, you and your partners should have near-equal, advanced experience.
- Interpersonal match — Fastpacking can be long and hard, and you will be together with your partners 24 hours a day. You better get along! I recommend testing relationships on day-long outings or time together in the real world before taking to the backcountry together. You should be aware of the dominant characteristics of your partners, as you’ll be exposed closely to those. Is your partner super organized? Do they like the leadership position? Are they a people pleaser? Do they get cranky if they don’t have snacks regularly? Do they like to run at night? Know your partners well before the heat of the moment.
- Fitness — Since a fastpacking trip is a physical event, you’ll need to be aware of the fitness levels of your partners. It’s alright if they don’t match so long as everyone in the group is aware that the group will be traveling at the pace of the slowest person. A pre-trip discussion about fitness, speed, and daily mileage is no place for ego. Have an honest conversation so everyone’s expectations are met in the field.
Approach
There is a daily rhythm to fastpacking. Wake up, boil water, sip tea or coffee, eat breakfast, pack up camp, put on running clothes, climb into your pack. Run, run, run, laugh, run, stop for photos, run, run, hike, hike, stop for a snack, run, run, run, hike, hike, high five your partners at a mountain pass, run, run. Search for a good camp, run, find a good camp. Change into camp clothes, set up camp, eat, eat, eat, laugh, eat, drink hot chocolate, sleep. Or some derivation of that. ;)
Everyone’s approach will be slightly different based upon their natural biorhythms and habits, however, so a group approach should be decided upon before the trip and reconsidered before the start of each day on trail. Will you rise early? How often will you stop for a break? Will you run into the night? Figure this out before you get yourself into a pickle of differing preferences on the trail.
Plan for an Emergency
Though the chances of an emergent situation are small, you must plan for them.
First, leave your itinerary with someone at home, and then stick to it. For long trips, designate planned check-in points, places where you’ll get enough cell service to check in, or times when you’ll turn on your satellite-based device (more on those ahead in this article) and give an all-okay signal to whomever is keeping track of you.
Next, have emergency/alternate exit points planned along your route so that, if you can’t complete it, you can still get safely out of the backcountry. Make sure the person keeping track of you at home knows these as well.
Discuss with the group what would happen in a variety of emergencies such as if someone becomes lost or gets seriously hurt or ill. Develop contingency plans for them. Be aware that you will need to be flexible in the field, but have your basic emergency-response framework in place.
Finally, approach your trip with risk aversion in mind. Thirty miles into the backcountry is the place to lower yourself carefully down a rock exposure, to take a break and recover if you’ve pushed a little too hard, and to use a knife with exquisite care.
Gear Selection
Once you’re out in the wilds, it’s just you and your gear. You better like everything you brought! In this section, I outline some of my theories on gear choices as well as some of the pieces of gear I’ve come to rely upon for fastpacking over the years.
Pack
Your pack is probably THE. MOST. CRUCIAL. gear piece you bring with you. You need a pack that’s comfortable, fits your body well, doesn’t rub you too much the wrong way (no pack is 100% comfortable all the time and anyone who tries to convince you of this hasn’t carried a pack a long way), and can hold the load you need to carry.
We’re at a cool time in pack-design history now, in that there are multiple ultralight to lightweight packs of moderate size out there that are made specifically for fastpacking. Even just 10 years ago, there were little opportunities for this kind of gear unless you were proficient with a sewing machine and could make and modify your own gear.
For fastpacking, I’m a fan of the Inov-8 Race Elite 24 (liter) pack as well as the Ultimate Direction Fastpack 20 (liter) and 30 (liter). I’ve also done overnight fastpacks with a couple packs made by Terra Nova. Six Moon Designs has the Flight 30 (liter) and Flight 40 (liter), which are designed specifically for fastpacking, but I haven’t tested them extensively yet. I’ve even fastpacked in the Osprey Talon 33 (liter) when my load was heavier and required a pack with more structure to hold it. You could potentially fastpack with the WAA Ultrabag 20 (liter), though I’ve yet to see it used much outside the Marathon des Sables race. There are more choices out there, for sure.
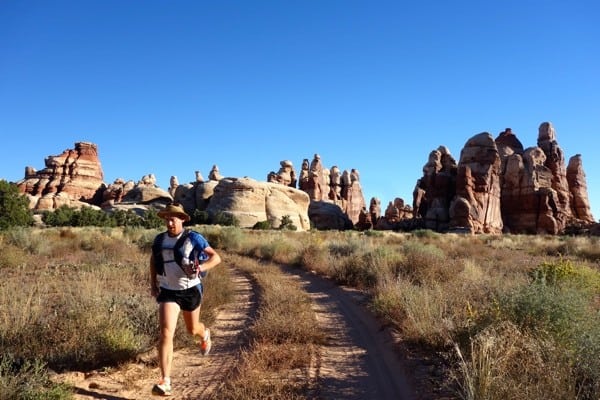
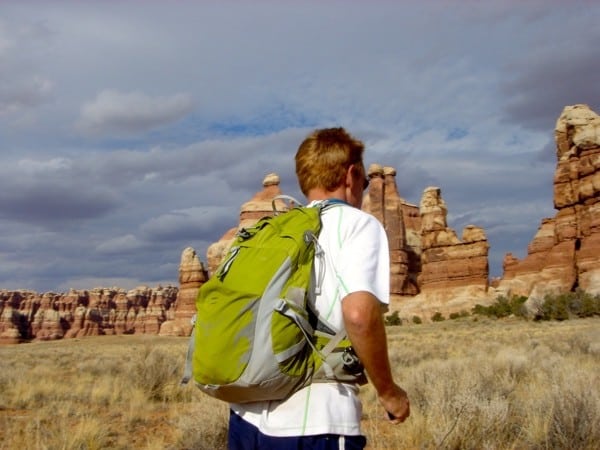
Bryon Powell runs with the Ultimate Direction Fastpack 30 in Canyonlands National Park.
I have found that volume-wise, I can use a 20- to 25-liter pack for up to three days solo and a week when with a partner with whom we share carrying the ‘group’ items like the stove, fuel, and sleeping accommodation, in fairly benign conditions. For a week solo or for a trip through cold or wet weather, I need 30 liters of space. However, 30 or more liters of gear, no matter how light each of the items is, adds up to significant weight. Even 25 liters of gear, if it’s food heavy for a longer trip, can be a challenge to run with.
I can’t tell you what pack to buy and no expert can. It’s a trial-and-error process of finding the pack that rides on your body the best. What I can tell you is that, for me, a fastpacking pack has to have several characteristics:
- Its back pad, the part of the pack that makes contact with my back, needs to be roughly the same height as my back from the top of my shoulders to the smallest part of my waist. If a pack’s back pad is much longer, it will either bunch on my back and be uncomfortable, or the pack will rise up behind my neck and head and be bothersome there.
- The pack should conform well to what you put in it, and should conform to your back. Ideally, for fastpacking, I want a pack with a soft back pad that will mold to the natural shape of my back. The more I can get the pack to act like a part of my body, the more comfortable I will be when running with it.
- If the pack offers a waist belt, this waist belt must sit comfortably around the smallest part of my torso. This is several inches higher than where people traditionally wear waist belts for backpacking. This will eliminate as much movement of the pack as possible when I run.
- Minimal shoulder padding is a must, as is an adjustable sternum strap. Some of the pack’s weight is inevitably going to rest on my shoulders, so comfortable and stabilizing strap-age here is key.
- There has to be very little motion of the pack against my back when I run, both in the horizontal and vertical directions. A pack working against me saps my momentum and can eventually lead to uncomfortable pack rub.
- A fastpack must provide me easy access to water, a day’s worth of food, my map and compass, water-purification chemicals, and my camera. Those are the objects I call upon over and over in a day of fastpacking. What this means is that I like some good pockets on the front of the pack.
Sleeping Bag
Your sleeping bag will also be a highly personal endeavor. Being comfortable while sleeping is of great import, as that’s when much of your recovery happens. I sleep a little cold, so I like to bring a sleeping bag that’s rated to 10 or 15 degrees Fahrenheit lower than the anticipated low temperature for wherever I’m headed.
I sleep with a down sleeping bag anytime, every time. They are lighter and pack down to a smaller volume than their synthetic counterparts. The whole argument about a wet down sleeping bag being more useless than a wet synthetic sleeping bag? Well, a wet sleeping bag sucks, no matter what it’s made of. There’s no reason to let your sleeping bag get wet. Never. None. Null argument. Sleep in down.
Buying a good, ultralight sleeping bag is NOT a cheap endeavor. The good news is that, if you treat them well, they last a really long time. My two go-to down bags have been around for 10 and six years respectively.
I’m a big fan of Western Mountaineering sleeping bags![]() and MontBell’s
and MontBell’s![]() ultralight down sleeping bags. Our household has several of them rated to different temperatures. Not cheap, but truly ultralight, and I am extremely pleased with their durability.
ultralight down sleeping bags. Our household has several of them rated to different temperatures. Not cheap, but truly ultralight, and I am extremely pleased with their durability.
Sleeping Pad
You want to sleep with a sleeping pad while you’re fastpacking? That’s cute. Oh, I’m totally kidding!
Some fastpackers and ultralight backpackers sleep with little to no sleeping pad, maybe just something that pads their shoulders and hips. I’m one of those people. After hundreds of nights sleeping on the ground, I’ve adapted to up to 14 nights out with just a tiny pad for my shoulders and hips, and for trips of under six days, I usually take no sleeping pad. When I do use my mini-pad, it’s small enough that it goes in my sleeping bag, not under it. This is definitely an acquired taste, so go minimal with your sleeping pad for just one night first lest you be cursing me if you don’t like it!
My sleeping pad is a modified Gossamer Gear pad, the version that looks like an egg crate. There are tons of egg-crate-like sleeping pads on the market, and some that are cheaper than Gossamer Gear’s. (Not by much though, as Gossamer Gear’s pads are quite reasonable.) But I’ve had the pad for years and it still gives me the support I need. That is, its compression over time is minimal. Additionally, their pads are scored so you can fold them not roll them. Many ultralight packs these days have a square back compartment into which you put a folded sleeping pad into, like the Gossamer Gear pad, which becomes the pack’s back padding. Of note, I’ve trimmed the heck out of mine, cutting off extra width that my body doesn’t need and a hole in the center where the small of my back doesn’t ever actually touch the ground. Every gram counts!
My last couple trips have been with the Ultimate Direction Fastpack 20![]() , which has a removable back pad that I can slide into my sleeping bag. It pads the ground a bit, but not as well as the Gossamer Gear pad.
, which has a removable back pad that I can slide into my sleeping bag. It pads the ground a bit, but not as well as the Gossamer Gear pad.
Side note, if your fastpacking trip includes sleeping atop snow or frozen ground, these above recommendations don’t apply. You’ll need a sleeping pad to insulate you from the cold beneath. Because I already sleep cold at night, I need a sleeping pad that extends from neck to toes. In this case, I use an ultralight inflatable sleeping pad made by MontBell.
Tent/Tarp/Sleeping Accommodations
When do you need a tarp versus a tent when you’re fastpacking? Tents are for bad weather, bugs, and psychological contentedness. Tarps are for bad weather, bugs, and psychological contentedness, too. In the majority of situations you will encounter while fastpacking, you could sleep fairly happy with a tent or a tarp. It will largely come down to personal preference. The two situations that might influence your choice more than others would be a huge weather event and mosquitoes. There are also several other kinds of sleeping structures that fall between the tent and tarp ends of the spectrum, including tarptents and bivy sacks.
To be blunt, tents and tarptents that are lightweight enough to consider using on a fastpacking trip are expensive. We’re talking $250 to $600. Full disclosure, I’m not an expert on ultralight sleeping accommodations. I haven’t taken the time or the money to invest in becoming an expert in this realm. I’ve found a couple pieces that work well for me and I’ve stuck with them. I’ll use the rest of this section to explain why I like the sleeping accommodations I currently use.
When I’m fastpacking with a second person and we desire a tent, we carry a couple-year-old Big Agnes Copper Spur UL2![]() . It weighs about three pounds for the whole package, including pegs for the ground, which means each person carries about 1.5 pounds. It’s a freestanding tent, meaning you don’t have to depend on ground pegs or tying things to trekking poles or trees to get it to stand up; this is good if you’re camping on sand or rock where pegs won’t hold. Also, it’s got full mosquito protection with a full tent, plus a separate fly. There’s a decent amount of floor space so you can hang out in the thing if you’re stuck in day of bad weather, its steep sides shed snow well, and it’s got great ventilation for camping in climates where condensation occurs.
. It weighs about three pounds for the whole package, including pegs for the ground, which means each person carries about 1.5 pounds. It’s a freestanding tent, meaning you don’t have to depend on ground pegs or tying things to trekking poles or trees to get it to stand up; this is good if you’re camping on sand or rock where pegs won’t hold. Also, it’s got full mosquito protection with a full tent, plus a separate fly. There’s a decent amount of floor space so you can hang out in the thing if you’re stuck in day of bad weather, its steep sides shed snow well, and it’s got great ventilation for camping in climates where condensation occurs.

Bekah Henderson Campbell in the fly-less Big Agnes Copper Spur UL2 in the High Sierra of California.
I’ve also spent some time out sleeping in the Shangri-La 2 tarp made by GoLite (the brand is facing bankruptcy at the time of this writing), which is well-sewn tarp that even has a zipper door. At roughly 1 pound, 8 ounces including pegs for the ground, with the tent pulled taught and set up tight, the Shangri-La 2’s walls are steep and come down all the way to the ground, allowing it to stand up to all kinds of nasty weather, including snowstorms and thunderstorms. It’s a two-person tarp and it’s also fairly dummy proof in its set up; you don’t have to be a tarp master to get this right and you can do it quickly if bad weather is about to hammer you. You do, however, need two trekking poles to hold it up. Though you used to be able to buy a mosquito net/ground cloth combo insert to go with this, the Shangri-La 2 comes with no mosquito netting and no ground cloth. There’s tons of ground space underneath the tarp, room for two people, packs, a dog or two, probably more. The two trekking poles set up in the middle of the tarp underneath, so they briefly dissect your inner ground space.
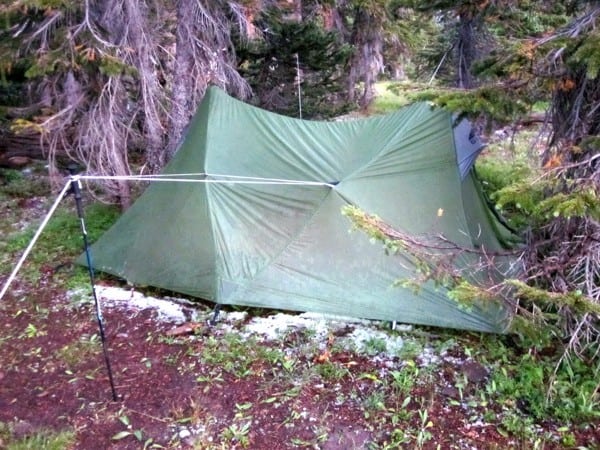
The GoLite Shangri-La 2 after weathering a thunderstorm in the Uinta Mountains of Utah.
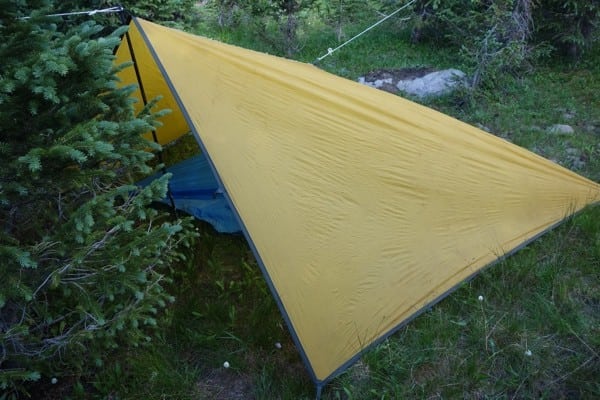
My other go-to sleeping accommodation is the Integral Designs Siltarp 2, which is 17 ounces including pegs for the ground and rope. This is a true tarp, a rectangle that you set up in whatever array best suits your needs. This tarp is meant to accommodate one or two people, but I’ve slept three people under it also. You can set up tarps with just rope, but many people find that one or two trekking poles are a good set-up addition. With a rectangle tarp and bad weather, you have to be quite careful with your set up. I usually go for clumps of trees that will help fend off precipitation, setting up a steep wall that goes all the way to the ground on the side where the weather is coming from, and overall keeping the tarp set up low to the ground. Using the Siltarp 2 for one person, you can get a couple cool configurations going and shut yourself in on all sides, keeping weather out. With two people and some finagling, you can get pretty close. It’s probably unwise to use a tarp when persistent bad weather is on your fastpacking schedule. There’s no mosquito netting or ground cloth.
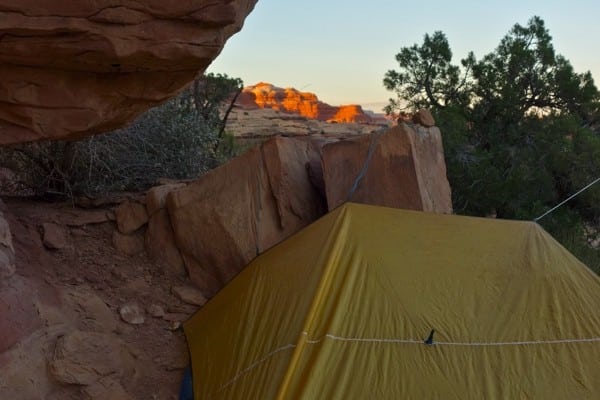
The Integral Designs Siltarp2 being used without trekking poles at Canyonlands National Park.
Whether or not you use a ground cloth when sleeping under a tarp is a matter of personal preference and the climate you’re fastpacking in. For almost no money and weight, you can cut open one of those black leaf-and-lawn garbage bags to make a ground cloth. You can also buy quite fancy and ultralight cloths, too. Ground cloths are good if you’re fastpacking in climates where the ground is perpetually damp or if weather is expected while you’re out. You can often get away with no ground cloth in desert environments. Sometimes, I forgo a ground cloth and instead sleep on the rain kit I always have with me. (See below for more details on my rain kit.) You might get your rain kit filthy this way, but it saves weight!
Bivy sacks are another option. Most offer not only a waterproof floor but also a full waterproof tube into which you put your sleeping bag as well as a bug screen that goes over your face. Some bivies also provide a waterproof cover that goes over your face. So, you could use a bivy sack with a waterproof face cover in lieu of all other sleeping structures, or you could pair a bivy sack with a bug screen over the face with a tarp. The former just plain doesn’t work for my taste. If I know there’s a chance of a weather event, I prefer to have a place I from which I can shelter from the elements and still move around, like a tarp. In this case, I set up my tarp and have a dry place under which I can cook a meal, hang out with my partners and play cards, keep my gear dry, and more. If you only have a fully waterproof bivy sack, your mobility while sheltering and gear protection is limited. I haven’t tried the tarp and bivy with mosquito face-screen option, but my guess is that the face screen and a regular headnet are pretty similar in terms of evading mosquitoes, so the improved waterproofing of the bivy sack is the major attractor here. [Author’s Note: This paragraph was added on 12/26/14 to answer readers’ questions about my thoughts on bivy sacks.]
Make sure to find out whether or not your sleeping accommodation has been seam sealed at the factory, and do so if it hasn’t. Most commercially available tents have been factory seam sealed. Some sleeping accommodations will need to be re-seam sealed every few years.
Side note, there are many situations where sleeping with nothing over your head is perfectly enjoyable, like if you’re headed out to a warm climate with no anticipated weather, for example.
Lighting
The kind of lighting you take with you on a fastpacking trip depends on what you plan to use it for. If you plan to do some night running and hiking, you’ll want a light with a powerful output for routefinding and obstacle identification on the trail. The most effective light I’ve found per unit of weight for night trail running while traveling ultralight are the products made by Zebralight![]() . With one CR123 battery and with the included clip that allows you to attach it to the brim of a running hat (and thus saving weight on the also-included-but-optional headlamp strap), they weigh in at under 90 grams.
. With one CR123 battery and with the included clip that allows you to attach it to the brim of a running hat (and thus saving weight on the also-included-but-optional headlamp strap), they weigh in at under 90 grams.
If you only plan to use your light only in camp, all you really need is the Petzl e+Lite![]() . It weighs under an ounce and puts off enough light to set up a sleep space, cook dinner, and read a map.
. It weighs under an ounce and puts off enough light to set up a sleep space, cook dinner, and read a map.
Always bring enough spare light batteries and consider bringing a back-up light.
Cooking and Eating Utensils
I’m a fan of hot food when fastpacking. That’s because it’s often chilly or it thunderstorms or you go a ton of miles and a hot meal makes you feel fantastic all over again. I’ve tried many of the ultralight stoves on the market including my own rendering of a homemade alcohol stove in a tuna-fish can. The lack of efficiency of some of this stuff makes me a little insane. Just boil me some water in the next couple minutes, okay?

The author using a Jetboil while winter camping at Yosemite National Park. Photo: iRunFar/Bryon Powell
Thus, I love the Jetboil. You can get the stove, cook pot, and cup/bowl of the Jetboil Sol Titanium Personal Cooking System![]() for 6.3 ounces plus a couple more ounces for a fuel canister
for 6.3 ounces plus a couple more ounces for a fuel canister![]() that’ll yield enough fuel for one person for about four days. The Jetboil boils a couple cups of water in just a few minutes.
that’ll yield enough fuel for one person for about four days. The Jetboil boils a couple cups of water in just a few minutes.
I carry one additional utensil, a Light My Fire Spork![]() . They make them in kids’ sizes, in addition to adult-sized sporks. I will even buy the kids version if I can find them so save a few more grams.
. They make them in kids’ sizes, in addition to adult-sized sporks. I will even buy the kids version if I can find them so save a few more grams.
Water Storage
Here’s my fastpacking water-storage set up:
- One Ultimate Direction bottle
 . I keep this close at hand, on the front of my pack if I can.
 - A one-liter plastic water bottle from a gas station/grocery store, though I prefer those that are made of a bit thicker plastic so it holds up to a couple weeks in the backcountry. I prefer this to a Nalgene bottle because it’s lighter and it’s got a little flexibility to it, making getting it in and out of pockets easier. I generally keep this in an outside pocket on main compartment of my pack.
- One (more more) two-liter collapsible Platypus water reservoir. This is an optional add-in to my kit if it’s super hot, if water sources are few and far between, or if I’m going to be dry camping away from a water source and need to carry water to my campsite. As you maybe can tell from my water-storage set up, I have trust issues with collapsible water reservoirs, and the Platypus is a bit stiffer plastic than some out there.
Water Purification
Every year I know someone who gets giardiasis from drinking untreated water. And once I got amoebic dysentery from cliff jumping into a lake in a developing country, which probably forced tainted water into my sinuses and down my throat. Having seen the debilitating results of water-borne illness, I think everyone should purify/filter their water in the backcountry, every time. (There remains a very small risk of still getting sick from something that isn’t killed or eliminated by chemicals and filters, but I think we should do our best to clean our water.)

An old water trough is now a backcountry water source at Canyonlands National Park.
These days, my go-to water-purification chemical is Aquamira![]() . I’ve used this stuff all over the world, including from water sources in East Africa that we shared with livestock, and–knock on wood–haven’t become sick with it yet. Aquamira, which is made up of two small bottles of chemicals and a small mixing cup, is easy and fast to use. You mix the two chemicals into the mixing cap, wait five minutes for one chemical to activate the other, pour the mixture into the bottle of water you want to purify, and wait 15 minutes for the purification to happen. Thus, you can be in and out of a water source and on the move again in just over five minutes for basically any volume of water you’d like to purify. (Note that Aquamira requires longer wait times for chemical activation and then purification of very cold or very dirty water.)
. I’ve used this stuff all over the world, including from water sources in East Africa that we shared with livestock, and–knock on wood–haven’t become sick with it yet. Aquamira, which is made up of two small bottles of chemicals and a small mixing cup, is easy and fast to use. You mix the two chemicals into the mixing cap, wait five minutes for one chemical to activate the other, pour the mixture into the bottle of water you want to purify, and wait 15 minutes for the purification to happen. Thus, you can be in and out of a water source and on the move again in just over five minutes for basically any volume of water you’d like to purify. (Note that Aquamira requires longer wait times for chemical activation and then purification of very cold or very dirty water.)
If you get a little squiggly about pieces of grass or dirt in your water, use the bandana or BUFF![]() you’re probably carrying to act as a pre-filter for your bottle. You can also let a bottle of water with floaters sit for about five minutes–the same amount of time it takes Aquamira to activate–so the floaters sink and then decant the water sans floaters into a second bottle.
you’re probably carrying to act as a pre-filter for your bottle. You can also let a bottle of water with floaters sit for about five minutes–the same amount of time it takes Aquamira to activate–so the floaters sink and then decant the water sans floaters into a second bottle.
I recently discovered the LifeStraw![]() , which is a straw with a filter on it. You nuzzle right up to a water source and suck water out of it to your heart’s content. I’ve taken it in the backcountry a couple times now and am pleased with its ease and speed of use so far. It weighs a little more than two ounces.
, which is a straw with a filter on it. You nuzzle right up to a water source and suck water out of it to your heart’s content. I’ve taken it in the backcountry a couple times now and am pleased with its ease and speed of use so far. It weighs a little more than two ounces.
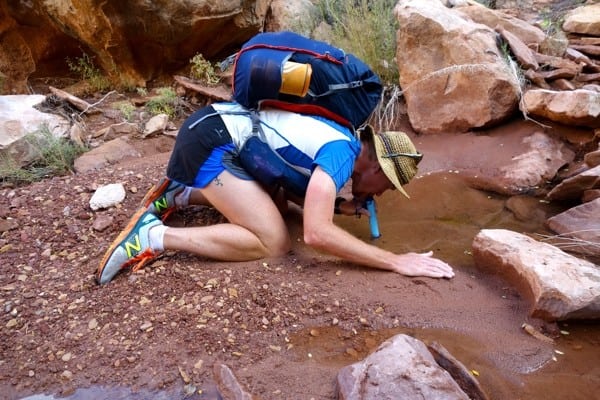
Bryon Powell using the LifeStraw at Canyonlands National Park.
There are many lightweight water filters out there should you want to go down that road. I’ve tried many over the years, and like the 3.5-ish-ounce Sawyer Squeeze the most of what’s currently out there for fastpacking.
Navigation
A good map and compass. Enough said, right? I mean, what else do you really need to find your way around this good earth? In my opinion, a compass with two-degree precision is enough for almost all backcountry forays. There are many compasses out there with two-degree precision, and most range around an ounce.
There are a bunch of apps now for smartphones that are pretty handy. You can download topographic maps so you can look at them offline, and there are several GPS apps that’ll locate you on a map, even if you’re not in cell range. Finally, there are the innumerate tried-and-true GPS devices that can literally navigate for you.
I cannot emphasize this enough: learn how to read a map, use a compass, and navigate by landmark sight. Don’t rely on electronics to do this for you. At some point the electronics will fail and you will be required to use your own skill. Be ready.
Food
Food is about as personal at it gets. The following are some of my preferred foods for fastpacking. Note, I keep all of my food in a stuff sack and I bring two gallon-size Ziploc freezer bags for every week of travel in which I double bag the garbage I produce. I store my garbage bag in the food stuff sack as well.
(Some of you might be noticing that my fastpacking methodology is heavy on the use of Ziploc bags. Indeed, and I recommend the use of freezer bags in situations where sturdiness is a factor. Also, used Ziplocs can be re-purposed from their life in the kitchen to a life on a trail, and they can be re-used for trips over and over. This methodology is still pretty environmentally friendly.)
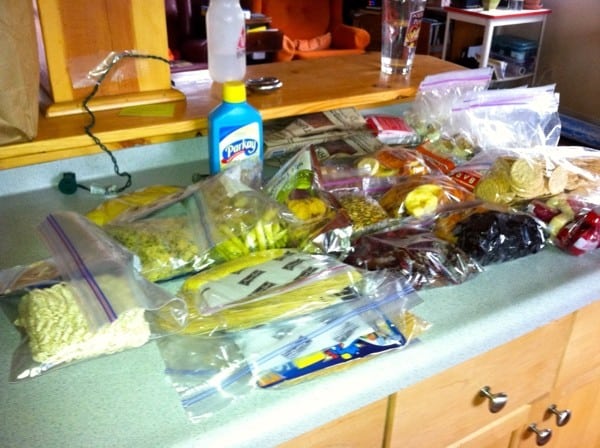
The author’s food for a seven-day, 140-mile trip.
Breakfast
My fastpacking breakfast is a little non-traditional, but it fills me up, sticks to my belly, and makes me feel happy.
- Instant mashed potatoes (Try to get the variety that has lots of dehydrated butter so that the potatoes have a high dose of fat in them, too.)
- Meat jerky
- Green tea or Starbucks Via
Trail Food
I plan to generally be on the trail for most of the day, eating on the go and stopping to sit now and then for snacks. As such, my food will be a mixture of that which you can eat while moving or relaxing. Also, I try to get my food choices high on the fat and protein scales for the satiation factor because you can never carry enough calories for what you’re burning on a multi-day trip, unless your daily mileage is quite low. Here are examples of what I might carry as trail food:
- LÄRABARS
- EPIC Bars
- Omnibars
- Bearded Brothers Bars
- The neighbor’s goat cheese (This is placed in a sealed container and eaten within the first day or two depending on the climate.)
- Salted almonds and/or mixed nuts
- Babybel cheese
- Corn Nuts
- Meat jerky or cured meat
- Fresh and dried fruit (fresh fruit for the first day, and then dried after that)
- Mushed-up avocado (Again, I place it in a sealed container and mix with lemon juice for preservation and I eat within the first couple days.)
- Nut butters and nut-butter mixtures
- Crackers
Just-Arrived-to-Camp Food
You’ve been hauling arse all day, workin’ it, and you roll into camp. You’re hungry but you’ve got to fuss with accommodations and gear before you can sit down for a meal. Here’s my camp appetizer:
- Ramen/Lipton Cup-A-Soup/Similar warm, salty soup with a couple-hundred calories
Dinner
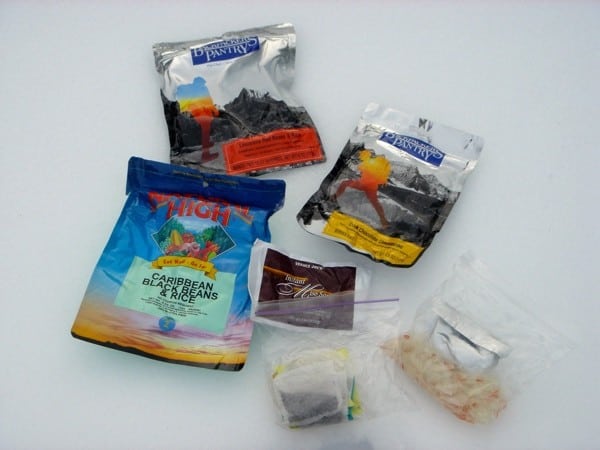
Often I splurge and buy backpacking meals with 800-ish calories for dinner. There are innumerate varieties out there, and so many of them these days are really tasty. But these larger backpacking meals can be about $10 a pop!
If I do my fastpacking trip on the cheap, I can make about the same volume of food for $4 out of a ready-made box of couscous that comes with some sort of flavoring packet, a package of tuna or salmon (choose the kind in olive oil for the fat), and maybe a fresh vegetable chopped in if it’s early in the trip, like a tomato, avocado, or pepper. Even moist kale pieces can make it to camp the first day as long as it’s not too hot! Before leaving on the trip, I empty the couscous and flavor packet into a quart-size Ziploc freezer bag. Once I’m in the field, I boil my water in the Jetboil, pour the boiled water into the Ziploc, seal it, and let the stuff rehydrate.
Sometimes I make my own sauce at home to go along with a fast-cooking grain for my first night out. Something that’s based on tomato paste or pesto is quite lightweight. Bring along a fresh veggie or two to chop into it. Good eatin’ for a couple bucks!
Dessert
Always eat dessert. ;) For me it’s usually a hot-chocolate drink and a nut-butter packet that’s mixed with chocolate or something sweet. If it’s a colder-weather trip, a chocolate bar.
Some just-arrived-to-camp and dinner food during a winter camping trip at Yosemite National Park.
Trekking Poles
Depending on the terrain, trekking poles can be a truly awesome addition to a fastpacking trip. I carry trekking poles when I’m in mountainous terrain that includes big climbs every day. I’ve tried so many pairs of trekking poles throughout the years, and I hope Black Diamond makes their Ultra Distance Trekking Poles forever because I’ve become a huge fan. I’ve used them on the rubble piles that are the Sawatch Mountains of Colorado and the Uinta Mountains of Utah, and I’ve used them for all 206 miles of the Tor des Géants in the Italian Alps. As discussed earlier, the use of at least one trekking pole is required with some sleeping structures.
Other Random Gear
The following is more gear that’s crucial on fastpacking trips:
Mosquito Headnet
It weighs a couple grams and can save your sanity if you get into mosquito-ridden territory or you’re sleeping with a tarp only and mosquitoes are around. The headnet is best worn with a brimmed hat to keep the netting (and therefore the bugs) away from your face. A rain kit (as discussed below) and a headnet along with mosquito repellent for your hands–the only skin exposed–is a pretty full-proof way of avoiding bugs. The best part about actually running while you’re fastpacking? Mosquitoes don’t pester when you’re on the move!
Lighter/Matches/Firestarter
Your Jetboil has its own igniter and you’re not planning to have a campfire? Bring emergency supplies for starting a fire, and bring supplies that match the environment you’re fastpacking through. Spending time in a desert or mountainous environment where your fuel won’t be dripping wet? Probably a lighter and a set of waterproof matches will do. Fastpacking in the Pacific Northwest or places where a lifetime of rain keeps fuel sources so wet they are soft and where there’s a small chance of finding dry tinder? You will need some heavier-duty firestarting devices. I recommend the Ultimate Survival Technologies BlastMatch Fire Starter and some homemade tinder made of dryer lint and Vaseline.
Toilet/Sanitation
I use an ultralight, small stuff sack as my toilet bag. Inside that stuff sack I keep paper towels, which have been cut in half. I budget four half paper towels per day, generally. Then, I bring one quart-sized Ziploc freezer bag total, and then one sandwich-sized Ziploc for every three days I’ll be out. I pack out all my used toilet paper and tampons in these sandwich-sized bags, which I then double bag for odor elimination and sanitation into the quart-size Ziploc. I also carry a small bottle of hand sanitizer.
Other toiletries I carry:
- Mini-toothbrush and toothpaste
- Mini tube of sunscreen
- Scent-less baby wipes (I dry them out at home and cut them in half. I rehydrate them with a bit of water at camp, and use one half for a daily wash of my face and a couple body parts and another for a daily wash of the, er, sensitive bits. I put my used baby wipes in with my used toilet paper.)
- Mini bottle of mosquito repellant
Of note, I carry out all my toilet paper and tampons, never burying or burning then. While I used to in the past, I no longer carry soap, even the biodegradable kind. Leave No Trace principles say you can use a small amount of biodegradable soap away from water sources, but I don’t personally think it needs to be in the backcountry.
Bear Bag/Rope and Canister
If you’re fastpacking in bear country, you’ll have to store your food and scented items (sunscreen, toothpaste, the bowl you eat out of, your eating utensil, your cook pot if you’ve cooked food in it, used toilet paper and tampons, etc.) away from them when you aren’t supervising it all, like when you’re sleeping. Depending on where you’re headed, some areas have regulations dictating how you store your food. In other places, you’re open to using your preferred method. Some locations provide a bear food-storage locker or a place from which you can hang your food at backcountry campsites.

Danni Coffman (left), Amber Steed (center), and Dave Chenault at a designated campsite in Glacier National Park. Note food stuff sacks hanging in the background for proper bear food storage.
A bear getting into your food is extremely dangerous for that bear, for you, and any humans who encounter it in the future. Don’t eschew proper food storage for expedience or out of laziness, ever. This might seem like an obvious statement, but I have unfortunately seen dozens of examples of improperly stored food in my backcountry career, with the most recent being twice this past summer in one morning in Colorado’s Maroon Bells Wilderness.
If you have to provide you own bear food-storage container, the most lightweight way to store food away from a bear is in a stuff sack hanging from a tree branch (or from a rope suspended between two trees in some circumstances) with a rope. This is an awesome food-storage method but it takes time to find an appropriate tree and to hang the food properly from it, as the food can’t be too close to the tree trunk, too close to the ground, or too close to the branch it’s hanging from. It’s a very delicate geometry equation. In my opinion, a good, safe hang takes loads of practice, and your first fastpacking trip is not the place to try it. I recommend practicing while out playing in the woods at least a half-dozen times before you do it for real. Of note, there are some environments where there literally aren’t trees accommodating of an adequate hang.
Bear food-storage containers![]() are plentifully available. I use those made by BearVault
are plentifully available. I use those made by BearVault![]() , mostly because they are clear and I can see into them from the sides. Further, they make two sizes, one that works for one person for about three or four days out and one that works for one person for about a week out. Not only are bear canisters bear (and other animal) proof, but they are also idiot proof. You simply shut your food and scented items inside, and leave it some distance from where you sleep. (Local regulations usually dictate how far away you need to keep your food from where you sleep.)
, mostly because they are clear and I can see into them from the sides. Further, they make two sizes, one that works for one person for about three or four days out and one that works for one person for about a week out. Not only are bear canisters bear (and other animal) proof, but they are also idiot proof. You simply shut your food and scented items inside, and leave it some distance from where you sleep. (Local regulations usually dictate how far away you need to keep your food from where you sleep.)
Of note, in some locations, you’ll have to store your food away from rodents. Follow local regulations for this, as sometimes it will involve hanging your food or storing it in a rodent-proof container.
Medical/Gear-Fix Stuff
Don’t spend your money on one of those $50 adventure first-aid kits. Here are the basics of you’ll need, which costs a couple bucks and which weighs about two ounces:
- A couple feet of duct tape (Roll it on a tiny dowel or pen. Some people recommend rolling it on your water bottle, but that will get wet multiple times a day and ruin the tape over time.)
- A couple feet of dental floss
- Needle with an eye big enough to thread the dental floss through
- Acetaminophen
- Benadryl
- A couple single-use packets of antibiotic cream
- A couple single-use alcohol pads
- One large square of packaged gauze
- About six feet of athletic tape (Roll it on a tiny dowel or a pen. Again, keep it dry.)
- About a foot of BSN Medical Cover-Roll Stretch Tape (This tape will save your bacon if you develop hot spots under your pack or on your feet. It’s sticky enough that it will stay put for a day on feet and for several days on the rest of your body, it’s thin, and its outer surface is slippery so it takes on friction really well. Also, at cold temperatures, it’s more sticky than duct tape and can be used to temporarily patch a rip in your ultralight pack.)
More valuable than the gear you bring are the skills you have. In my opinion, you shouldn’t go to the backcountry without certifications in CPR and the Heimlich maneuver. I’d also recommend taking a wilderness first-aid class. In a class like this, experts will teach you how to use the above-listed gear, what you find in nature, and the other stuff in your pack in emergent situations.
While I’d prefer you learn some of these skills via a wilderness first-aid class and not from some woman on a website :), the above-mentioned stuff/skills can be used in innumerate ways. The duct tape, dental floss, and needle can be used for on-the-trail gear fixes like repairing a broken pack strap; patching a rip in a tarp, rain jacket, or pack; or patching a rip of a shoe’s upper or a separation of shoe’s sole and upper. I once fashioned a whole new sternum strap out of duct tape when mine ripped off the shoulder strap. Address blisters with the needle and alcohol pads. Use the athletic tape and duct tape to support a bad sprain or to help put together a field splint for someone with a possible broken bone. The gauze, some clothing from your pack, and the athletic tape can be used to compress a major bleed. I used this method once when a backpacking partner severely cut their hand at the bottom of the Grand Canyon. Acetaminophen for fevers and pain, and Benadryl for an allergic reaction. I once saw CPR used to resuscitate a lightning-strike victim who wasn’t breathing. [Author’s Note: This paragraph was added on 12/26/14 to answer readers’ questions about how I do/would use my medical/gear-fix stuff.]
Knife
I carry the Derma Safe Folding Utility Knife![]() . It’s a bonafied, upgraded razor blade that folds into a plastic storage compartment. This knife costs almost nothing, weighs about seven grams, and is super sharp. (Be careful!) It is not made for heavy-duty cutting, obviously, but it’s done everything I’ve needed it to in the backcountry, including making wood shavings from a stick for tinder.
. It’s a bonafied, upgraded razor blade that folds into a plastic storage compartment. This knife costs almost nothing, weighs about seven grams, and is super sharp. (Be careful!) It is not made for heavy-duty cutting, obviously, but it’s done everything I’ve needed it to in the backcountry, including making wood shavings from a stick for tinder.
Comms with the Outside World
There are plentiful options for satellite-based communication with the outside world, satellite phones, SPOT tracker![]() , DeLorme InReach devices
, DeLorme InReach devices![]() , and more for safety check ins and emergencies. If I carry one, I prefer a satellite phone. You can rent one at low cost and it allows you to communicate fully with the outside world.
, and more for safety check ins and emergencies. If I carry one, I prefer a satellite phone. You can rent one at low cost and it allows you to communicate fully with the outside world.
Of course you can carry your smartphone if the area you’re headed to has cell service.
Of note, I recommend ONLY using your phone for safety check ins and in an emergency. Being disconnected in the wild is a true gift and rarity. Embrace it!
Camera
It doesn’t really matter what kind of camera you carry, but bring one as well as a spare battery. Document the awesomeness! If you’re bringing your phone, it can double as your camera, as well.
Clothing Selection

The author with typical clothing choices at sunrise while fastpacking the Tahoe Rim Trail.
The basis of your clothing selection is going to be running clothes. There’s an approximately 100% chance you won’t be moving as fast as a regular run because you’re running with weight on your pack, but you may very well be working pretty hard and generating body heat and sweat because of that weight. I generally fastpack in the same clothes I’d wear for a long run in that particular climate.
Your shirt selection is super critical. You don’t want big seams that rub between your pack and skin. Sometimes seams are unavoidable, so choose flat-locked seams where the loose, material ends are tucked in or choose a shirt whose seams are minimally constructed. You also want to wear a shirt that will cover the entire surface area of your pack. Fastpacking in a sports bra or a tank top where the pack is in contact with your skin: this might sound awesome from a cooling standpoint or attractive aesthetically, but I can virtually guarantee you’ll rub your skin raw if you do this for more than a short time.
Your bottoms selection–shorts, capris, whatever the weather calls for–should be your go-to, always-reliable bottoms that are tried and true over much running before your trip. Let me be frank here, you don’t want to deal with chafing of your balls, hoo ha, or inner thighs in the backcountry. It’s bad enough when it happens on a regular run and you have to do some painful first aid afterward. Having a problem like this for multiple days in the wilderness could mean true trouble.
I’ve personally taken to wearing compression shorts for multi-day fastpacking trips for two reasons. First, they keep the dirt out of the, er, sensitive bits. There’s just no avoiding getting filthy, so adding a clothing barrier between my sensitive bits and that dirt/sand/whatever is helpful. Secondly, compression shorts provide support for muscles that tire on a fastpacking trip.
At the risk of stating the obvious since you should be wearing something you regularly wear for long runs, both your running top and bottom should be made of your favorite moisture-wicking material.
Sports bras, underwear, and socks? I can’t emphasize enough that you should wear whatever works back at home for your long runs and races. TRY. NOTHING. NEW. WHEN. GOING. INTO. THE. BACKCOUNTRY.
The choices for what layers to add for insulation from the cold and other-weather protection are entirely dependent on your personal thermometer and the climate you’ll be trekking through.
I recommend bringing a full set of separate clothes for camp. If you’re putting umph into your fastpack, you’ll roll into camp every day sweaty. Almost always my first priority is getting out of my damp clothes and into something dry. Usually my camp clothes are a pair of running tights (I choose running tights so that I can actually run in my pants if the weather is cooler) and a long-sleeve wool shirt, its weight depending on how low the nightly temperatures will be.
For the women here, I strip out of everything, including my underwear and sports bra, to put on camp clothes. I usually bring one sports bra for a whole trip and one pair of underwear for every three days out. I like to get out of these in camp!
I almost always bring an ultralight puffy jacket. My personal thermometer runs a little reptilian, so basically the only place I DON’T bring a puffy is the Sahara Desert. For certain climates, your personal thermometer might not require a full-on puffy, but some sort of insulation–a thin Primaloft or similar jacket–will be critical for time in camp.
I recommend bringing a rain jacket and rain pants, even if the weather forecast is benign. If you’re going to be out for several days, there’s always the chance that the forecast could change. When it’s not raining, a waterproof layer can block the wind and hold in your body heat. Sometimes I bring an ultralight rain kit, like on a fastpacking trip through a desert climate where there’s no rain in the forecast. If I am fastpacking through mountain terrain where I anticipate being in an afternoon thunderstorm or another more extended weather event, I opt for a more solid rain kit. I may opt for a more solid rain kit if I anticipate wearing it through close encounters with rocks, brush, or anything that can rip my thinner ultralight gear, too. Finally, as discussed earlier, a rain kit is a life saver in mosquito country, for time in camp and occasionally time on the trail.
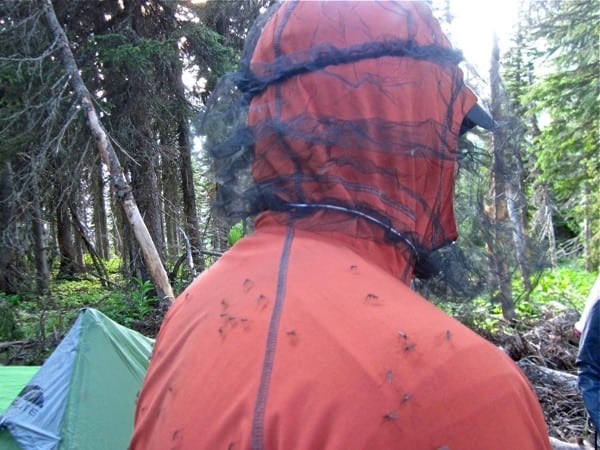
David Chenault evades mosquitoes with a headnet and rain jacket in Glacier National Park.
That’s my basic fastpacking clothing kit. If the weather is chilly, I might option in two shirts total for running, both a long-sleeve and a short-sleeve shirt for an extra layer. While I don’t personally love arm sleeves, here’s a spot where they could be very useful for those who do. Sometimes I option in an ultralight windbreaker jacket; you know, one of those things that weighs under three ounces. It blocks wind and holds in body heat, which can be helpful in innumerate fastpacking situations.
Almost always I bring a BUFF, which is infinitely useful beyond head insulation. And a brimmed hat is crucial for sun protection. I’ll bring a full, warm hat and gloves if the weather calls for it. Also, I might option in waterproof gloves for extended weather events. (For some of our favorite running gloves, check out our best running gloves article.)
Shoes
Like clothing, your shoes will be a matter of personal preference. Personal experience as well as time on the trail with others has shown me that people who wear shoes with at least some protection and stability in the rest of their trail running can generally wear the same shoes while fastpacking. However, those who normally run in minimalist or lightweight running shoes will have to get themselves comfortable with a bit more supportive/protective of a shoe in order to be comfortable while fastpacking for more than just a day or two.
Also, based upon personal experiments on fastpacking with and without rock plates in my shoes, I recommend fastpacking with a rock plate, as rocks jab up into the soles of your shoes a lot more when you’re landing with the extra weight of your pack. Side note, you can actually make homemade rock plates and install them under your shoe’s insoles. Test them amply before your trip.
More Tips for the Trail
Here are a few more tips for the trail that haven’t been covered elsewhere:
- Keep your spare clothes, sleeping bag, and electronics dry. Whether it’s weather or your own sweat melting through the fabric of your pack and into your gear, this is crucial. I almost always fastpack with my sleeping bag in a Sea to Summit ultralight waterproof stuff sack. If I am likely to encounter weather, I put my extra clothes in gallon-size Ziploc freezer bags. If the weather is going to be benign, I opt for used plastic shopping bags from the supermarket. My camera gets two Ziploc bags. If I’ve rented a satellite phone, I carry it in an ultralight waterproof stuff sack. My light(s) and spare batteries get their own Ziploc bag.
- Take care of issues that arise early and often. Don’t wait until a hotspot on your foot becomes a blister, or for a friction point from your pack to be rubbed raw. Taking five minutes to address an issue before it becomes a problem can save you hours and loads of discomfort over the course of your trip.
- How much food to pack will come down to your body mass and how well you perform in caloric deficit. Suffice it to say, it’s virtually impossible to go out for more than an overnight fastpacking trip and carry enough calories to match your energy expenditure. Over the years, I’ve become acclimated to doing with less for a week or so of hard activity and my body mass is fairly low, so I can get away with 2,500-2,700 calories a day for high-mileage days. If I’m headed into colder conditions, I will bring an extra 500 or so calories a day to keep the metabolism revved and the body heat coming.
- Pack your pack for comfort and ease of access to the things you use the most. The following is how I almost always pack my fastpacking pack (which is different than backpacking). Sleeping bag goes to the very bottom. Next, low down to the middle of my pack and against my back goes my food stuff sack, which is the heaviest item. Next to the food stuff sack and toward the outside of the pack/away from my back is where I put my extra bag(s) of clothes and sleeping-structure stuff. On top goes everything that’s left, my Jetboil, toilet bag, etc. In the easy-to-access pockets on the front of the pack I carry the Ultimate Direction water bottle, the food I’m going to eat for the next couple hours, map and compass, camera, and water-purification chemicals. Most fastpacks have exterior storage pockets on the main part of the pack, and in those I carry any extra clothing layers I want at the ready, like a rain jacket, the rest of the day’s trail food, and extra water-storage containers.
Bryon Powell fastpacking with the Osprey Talon 22 in Canyonlands National Park.
- Use care with foot placement while fastpacking. If you’re running along on a normal trail run, you are usually not shy about stepping on small rocks. Sure, you feel them under your feet but they are no big deal. On a fastpacking trip where you’re jogging and hiking all day with weight on your back, those rocks will start to hurt a lot. Use more care to land on flat, benign surfaces when you can.
- In fastpacking, you do more hiking than you would on a long run, because of that extra weight on your back and the fact that you’re out there for several long days. I generally hike all the uphills, save for those that are small and shallow, and then run the flats and downhills, save for the super tech-y ones. There are exceptions to this. If something is rocky, no matter its grade, I’ll probably powerhike through it rather than run it, to save my feet. Also I try to put some oomph into my powerhiking so that I’m still moving at a good pace even if I’m walking. In time and with practice, you’ll find the rhythm that works for you.
- Choose your campsite according to local regulations and with care. Some public lands have designated campsites that you’ll sleep in, while in other places you are on your own to find a spot. Always adhere to regulations mandating how far from a trail or water source you can camp, how far away from your food you must sleep in bear country, and what kinds of surfaces you can sleep on. If I’m camping in bear country and will be hanging my food, I shop for campsites based upon a good tree or trees for this. If I am camping with a tarp and there’s a possibility of weather, I look for clumps of trees that will help protect me from the elements. A nearly flat surface to sleep on is good, and it’s preferable to find something soft, though you shouldn’t sleep on delicate greenery. Perhaps the perfect sleeping surfaces are, thus, bare sand or pine needles.
Camping in a protected batch of trees and on a durable surface in Utah’s Uinta Mountains.
- Test, test, and keep adapting your kit. The list of what I take on a fastpacking trip and my tips for a happy, healthy outing are, at this point, based upon a load of personal experience. But both of these evolve through time as my knowledge base evolves and as new gear becomes available. They say in life we are supposed to be perpetual learners and the same is true for fastpacking. Consider each trip a testing ground for not only your gear, but also your personal skill set.
Meghan Hicks’s Favorite Fastpacking Gear
I’ve mentioned loads of gear throughout this article that I call upon on my trips, mostly to help explain the features of the gear that are useful to me. Here I whittle down the best of the best that’s currently out there for fastpacking for me:
- Ultimate Direction Fastpack 20
- Integral Designs Siltarp2
- Western Mountaineering sleeping bags
- Black Diamond Ultra Distance Trekking Poles
- Jetboil products
- Aquamira water-purification products
- Light My Fire Sporks
- Omnibars
- Breaded Brothers bars
- Instant mashed potatoes
- Derma Safe Folding Utility Knife
- BSN Medical Cover Roll Stretch Tape
Call for Comments
I’d love to get a useful discussion going in the comments section of this article that improves the information available in this guide.
As we all have our own preferences and favorites, for those of you who have fastpacked before, share the gear and tips that have worked best for you.
For those of you who are new to fastpacking, feel free to ask questions!
[Editor’s Note: You can also check out our fastpacking and adventure running gift guide for more ideas on gear for your next fastpacking trip.]
