I have introduced a lot of friends to trail running by inviting them on the trails with me, and through designing and directing a trail running race series, I have also introduced a lot of strangers to trail running, too. The question that is undoubtedly asked each time I invite someone out for a trail run is, “How hard is it?” This question gives way to two more specific questions, the first being, “How much uphill will there be?” And the second, less-obvious question, “How technical is the trail?” In my experience, people are concerned about how challenging it will be on the cardiovascular system and then they are curious whether they will stay right side up on the trail.
Though there is much about running that is natural and instinctual, intentional technique can take you further as the trails go uphill, downhill, side-to-side, get technical, and more. With this article, I aim to demystify some of trail running’s basic techniques.
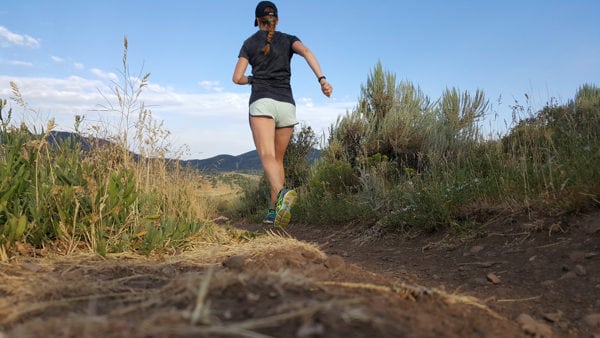
Good technique, like dropping an arm to help balance you, can help you trail run more efficiently. Photo: Rhielle Widders
Running on Flat Trails
Amongst my friends, I am known for claiming a trail is flat when it in fact traverses gentle slopes or rolling hills. As you become well-acquainted with trail running you will know what I mean when I say, “There is no such thing as a flat trail, just less uphill or less downhill.” The key is that terrain is relative so although the trail may not be flat, it may have flat sections in comparison to other trails that consistently climb or descend. These flat spots are opportunities to open the throttle a bit and increase your speed. Depending on the technicality, you can modify your stride to function much more like a road-running stride with regular turnover and arm swing.
I generally use these flattened out spots for a few purposes. First, recovery. There is nothing like going uphill for a length of time and then getting a break with a flat section before heading up the incline again. Breathe deeply and regularly, all the way down into your belly, and allow every part of your body to become re-oxygenated before heading uphill again. You might also need a break from a prolonged downhill section and the flattened-out section may be reprieve from the jarring downhill and constant mental focus. In this case, the flat may actually feel uphill due to the rapid changes in effort level. Focus on keeping your turnover quick and touching down softly to maintain your speed.
In a race setting, these flat sections of trail are great opportunities to run aggressively and make moves without blowing up. Other runners may use the flat sections to recover completely but if you are able to maintain the same effort on the flat as you used on the uphill, you will be able to pass other runners and move through the pack.
Running Uphill
Admittedly, running uphill is a mental challenge for me. In anticipation of a run, I can envision a section of my daily loop and blow its 1,000 feet of elevation gain and loss completely out of perspective. This can create a mental block in my head that I am forced to hurdle every day. I have found that I am not unique: everyone seems to be intimidated by either the uphill or downhill, some people by both. There are mental and physical tactics that can be used to get you over those barriers and keep you out on the trail. Even if you aren’t challenged by the uphills, consider the following techniques to increase your effort and agility while ascending.
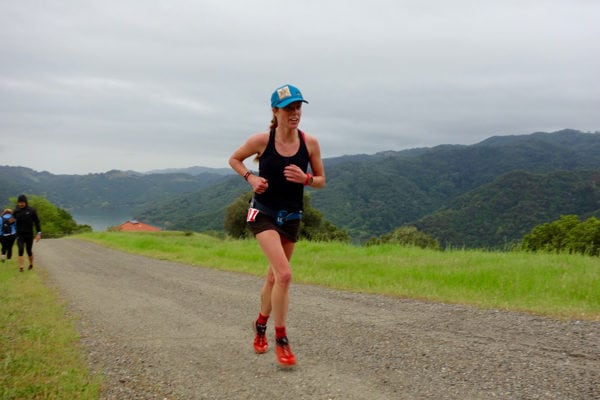
Anna Mae Flynn uses good running form, including leaning forward from the hips and landing with her feet beneath her center of gravity, to ascend during the 2016 Lake Sonoma 50 Mile. Photo: iRunFar/Meghan Hicks
Mentally, I am forced to focus on my breathing to control my pace and keep my thoughts positive. I know what it feels like to blow up and I know what kind of effort will put me there. I pay attention to my breath rate: two steps for every breath in and two steps for every breath out. If I am breathing ‘two steps in, three steps out,’ then I can likely increase my pace. If I am breathing ‘two steps in, one step out,’ then I am approaching my personal blow-up point. If the terrain isn’t changing soon, I need to ease my effort. I have found this formula to be a good general rule. It seems to work regardless of pace, pitch, and more–and it seems to work well for my friends when they try it, too. When I feel myself broaching the level of ‘two steps in, one step out’ or even ‘one step in, one step out,’ I start to sigh my breath out, trying to fully empty my lungs so I can take a bigger breath in. The key is to make an audible sound by forcing the breath out of your lungs. It sounds like a very fast sigh. Try it!
There also are a few physical tricks to increase your speed and agility while climbing. First of all, I give you full and complete permission to WALK! When you start to feel your breathing go beyond your control, it is time to walk. When the ground under your feet is too technical for your skill set, walk! When you just feel like slowing down and taking a gander at your surroundings, walk! For a sport called trail running, I sure do a lot of walking and it is just fine. We all do. I remember once asking a friend (whom I later paced to his first sub-24-hour finish at the Wasatch Front 100 Mile) how he manages to run 100 miles. His answer was simple, “I don’t run it, I walk it.” He elaborated that he runs the flats and the downs and walks the ups. Still, if the guys and girls who are smokin’ fast are walking, we mere mortals should certainly feel comfortable doing it as well. Your walking can be anything from a leisurely hiking pace to a powerhike.
‘Powerhiking,’ that’s new trail runner jargon. This is one notch down from running on the speed dial. When I am running uphill, it seems I start at a nice trot. When I get tired, my pace slows to an uphill jog. When that becomes too challenging, it slows to a powerhike. The main difference between powerhiking and jogging is that, when powerhiking, both feet are never off the ground at the same time. Depending on the pitch and the terrain, powerhiking is often faster and more economical than running. I remember running a 16-mile trail race once when someone who was powerhiking passed me as I was jogging an uphill. When I mimicked her movement, my breathing rate slowed from ‘one step in, one step out’ to ‘two steps in, one step out.’ Powerhiking looks different than walking fast. The upper body leans forward, just in front of the legs, and your hands may come to your knees. If that’s the case, the hands and arms push off of the legs to help create leverage as the leg straightens. This movement may help you tackle the steepest terrain with efficiency.
Your body position while uphill running differs from powerhiking. Starting with the upper body, lean into the hill with the upper body just slightly ahead of the hips. The steeper the hill, the farther forward the lean. Eyes should be anywhere from two to 20 feet ahead. The steeper the hill (or the more technical the terrain), the closer in you’ll set your gaze. Your arms are close to your body, swinging back and forth quickly. The legs mimic the motion of the arms, so if the arms swing quickly, leg turnover will also be quick and light. The steeper the trail, the shorter the steps need to be. Resist the urge to maintain regular stride length while slowing the turnover. Slowing the turnover comes naturally to me so I have to focus on quick, short strides. You can also focus on driving the knee up and bringing the foot down straight under the knee and that will naturally shorten the stride and allow for a quicker turnover. The steeper the terrain, the higher the knee drive.
Downhill Trail Running
For me, going downhill is when I get to relax and allow gravity to carry me. I learned the ease and flow of running downhill in high school and college during cross-country practice. Running downhill is a skill set, like swimming or riding a bike. Very rarely, running downhill comes naturally to someone—most people have to work on it. Downhill technique can take time to master and in the process you will likely fall a few times. Not ideal, obviously, but part and parcel to trail running! Consider it an opportunity to freshen up your first-aid kit and grow your book of running lore. The scars on my knees are badges of honor that I show off while telling tales around campfires with trail running friends.
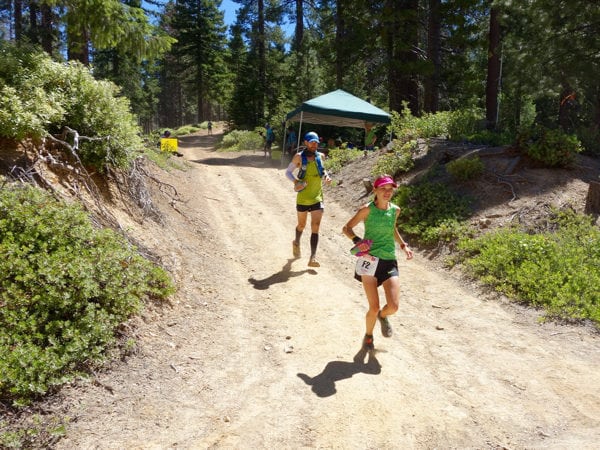
Kaci Lickteig runs downhill efficiently, leaning slightly forward in her trunk and landing with her foot beneath her, during the 2016 Western States 100. Photo: iRunFar/Meghan Hicks
Let us focus on tackling an extended downhill. This would include running downhill longer than one mile or any distance during which you can actually get in the groove of running downhill. Just as with uphill, downhill technique will vary due to pitch differences and technicality. Downhill also includes an element of risk. This should not scare or intimidate you as any terrain can be tackled using the correct technique.
However, in the event you do not feel safe, I give you full and complete permission to WALK! There are several situations when walking downhill is necessary and they all involve an elevated risk of falling. You may become very fatigued during a prolonged downhill and need to take a break from the beating. Walking would be the perfect way to do that. Another situation may arise when the pitch is too steep to comfortably run down it. Walking is a great and safe alternative. The terrain may be too technical due to large amounts of rocks or overgrowth and walking through that section may be the best tactic. I have been in each of these situations in trail races and used walking to get safely through. If you think walking might slow you too much for the blue ribbon, I urge you to recall the story of The Tortoise and the Hare.
I want to stress is how important it is to stay light on your feet while running downhill. Stand up and skip around the room. No, actually do it, four or five skips right where you are. Are you back? Let me explain, skipping involves two parts. In the first part, you touch down with force in order launch up off the ground and propel yourself forward. The second part involves returning to the ground briefly in order to shift your weight to the other foot. Now, stand up again and give me five more skips. Notice how transitioning from one foot to the other involves a lot less force than the forward momentum. That is exactly how it should feel when you are running downhill. How will you go forward if you are not launching yourself forward with force? Gravity. It takes care of almost all of your forward momentum.
Stand up and run in place for about 10 steps but make sure it is quick and light, just like the skipping. Notice your body position. How is your upper body positioned over your lower body? Where are your arms? How are you landing on your foot? Go ahead, give it a try. Still sitting? I’m serious, out of your chair! First, to address the footfall. Notice that the quickest transition comes when you land on the front half of the foot first. Next, your heel drops so that you can spring back off of your toes. Mastering this sensation of running ‘front half first’ is 90% of trail running technique because it keeps you balanced over your center of gravity. Once you are balanced, the rest comes easily. Consider this technique equal to learning how to balance on a bike–there are a lot of other parts that go into riding a bike but once you have the balance down, the rest comes naturally.
Observe that the upper body is positioned directly above your hips, not leaning back. Many people lean back and land on their heels while running downhill in an attempt to slow down. You may temporarily feel like you are in better control but I try not to make this a habit. Leaning back will increase the amount of impact your lower body has to absorb, causing quicker fatigue and an increased chance for injury. Instead of leaning back, land lightly underneath you and on the front half of your foot.

A blister from heel striking while running downhill for a long time. Photo: Karen Riley
You will have to vastly increase your turnover to achieve this—which is hard work—but you will be in better control and you will be much kinder to your body. Turnover is the rate at which your feet hit the ground. Turnover is the technique you will use to control your downhill speed. Perhaps counter to intuition, turnover will increase in sections that are technical or steeply downhill, as you will need to take shorter, more-frequent steps. Turnover decreases and the stride can lengthen during a sustained, low-grade downhill pitch or on a trail without much technicality. Keep in mind that even though the stride lengthens, you should still land on the front half of the foot.
Your arms are for balance. They are giant counterweights to whatever it is that your legs are doing. Use them to alter your center of gravity and give you an advantage. During a trail running photo shoot, I was once asked to normalize my arm swing, “Can you make it look more like a normal runner?” Before that point, I never realized that it wasn’t a ‘normal’ look for trail runners to have arms flailing all over the place. After that, I became more observant of the ways in which I use my arms and have found that they can be an incredible tool. If you start to bobble a little during a technical section, you can drop one arm to regain your balance. You can open your bent elbows out wide, like you are dancing the funky chicken, and increase your lateral sensitivity and reach. Play around with the way you swing your arms while you run and find those sweet spots that give you more balance. This is a major key to staying upright when moving quickly through technical and steep terrain.
A runner flails her right arm while running downhill to keep her balance. Photo: iRunFar/Meghan Hicks
Now that you have a good picture of the general downhill body position, I am going to break all the rules and tell you that there is a time when you will run heel first and lean back. Bear in mind, this should not be your primary mode of transportation as it can be taxing on your skeleton and soft tissues, but there are certain situations when this technique works better. One occasion is on a very steep pitch, when it is too steep to get a full, normal leg turnover. There was a time when I was running in Moab, Utah with iRunFar editor, Meghan Hicks, when we started down a steep, slickrock pitch that jeepers brag about. I noticed that on that pitch, I completely stopped using my hips as joints and my thighs as levers. Instead, my knees and ankles were doing all the work. It was almost as if I was sitting in a very shallow squat, hip joints mostly not moving, and then swinging my knees below me. Try this motion on a road or graded trail first as it takes some getting used to. Then find something steeper than you would normally comfortably run down and then sit back just a little bit and let the knees do all the running for you. You may use a very similar technique when approaching rocky sections that force you to step down, like a staircase. In order to move through it quickly, sit back just a touch and transfer the movement from the hips down into the knees. Land with a flatter foot and then move the opposite leg forward to the next step down.
Encountering rocks, stumps, roots, and more are realities of downhill running that cause further challenge. When you come upon a rocky section, you will want to pick a line. This means choosing the spots where your feet will land from the start to the finish of the rocky section. The first couple of times you practice this, stop at the top of the section and first visually choose the rocks that you feel most comfortable using for a platform. Next, visually connect the dots until you have ‘found your line.’ As this becomes more familiar, you will be able to do this on the go and over prolonged sections of trail. Picking the right rock for landing is another skill learned only through experience: too small and you may bruise your foot when you land on it, too large and you may not make it over it completely, causing a trip-up. Here are a few ideas on how I pick rocks. If the rock is large enough, I will land with my entire foot on the rock or just barely on the side facing me as I approach it, using it to slow momentum if needed. If it is too small to find a flat surface on it, I will land just on the other side of it, looking for the flattest spot that will fit my forefoot. I then use very quick turnover so that I don’t have to balance in the small spot for very long. Remember, the more technical the trail, the faster your turnover should be as it requires less balance and decreases the risk of a fall. It is a rare occasion that I choose to land on the ground just before a rock. I have found that if I do, I might catch the top of the rock with the toe of my shoe, causing a trip up. I call this type of falling an alligator because that rock just reached up and grabbed me like an alligator.
Rolling Hills
Every once in a while you come across that perfect section of rolling trail that allows you to stretch your legs and maximize your power. You never get too tired on the ascent and you don’t end up beat up from the descent. This is the type of trail running that will make you feel like a hero, especially if the trail is buffed out and smooth. The momentum you gain from running downhill will carry you through the uphill. You can push on both the uphill and the downhill because neither of them will last too long to wear you out. It can be the best of all worlds… if it is done right.
Consider how you would need to adapt the body position and technique described previously. Depending on the length and frequency of hills, you may have to adapt quickly. Having each of these skills mastered will allow for easy adjustments, carrying the momentum from one section to the next. If you are a skills expert, what can go wrong?
Recovery. When the terrain allows you to push nearly all of the time, it becomes challenging to find opportunities to drop the effort level and recover. If the frequency of the hills is regular, you can run hard for five hills and easy for one. If the frequency is irregular, you can use time as your tool. You can choose to push for 10 minutes and then back down to 80% for one minute. You may also want to have some home-court advantage or route knowledge—especially in a race setting—on your side to know if the section following the rolling hills will allow for recovery and if so, ask yourself if you have the capability to make a move on the rollers knowing that you can recover later.
Lateral Movement
This final technique is a great way to flatten out a trail. When ascending or descending, lateral movement will allow you to break up the pitch of the trail while still allowing for general forward motion. In a situation where the trail is wide and steep you may be able to serpentine a bit. I have found this technique to be particularly applicable on jeep trails and doubletrack. These roads are cut at pitches designed for motors. Should you need, you can snake your way from one side of the trail to the other, which will add on distance but decrease the pitch angle of your route. In the long run (pun intended), you may be better off maintaining a lower effort and going a longer distance instead of blowing up in an effort to keep a straight line up or down the steep pitch.
In a singletrack situation, you can still use the outsides of the trail but with a much different technique. Think of a football player doing a ‘fast feet’ drill. Legs are at least shoulder-width apart and there is a distinct shuffle from side-to-side. This same movement can be used to shuffle your way up or down a hill. Take really short steps and use a bit of pendulum movement, rocking from side-to-side. I think this works particularly well where the bottom of a trail has a deep rut and is not wide enough for my foot to land without the risk of turning my ankle. Shuffling from one side of the rut to the other keeps me moving forward at a higher speed than if I slowed to carefully pick my foot placement. Also, this lateral movement really shines if there are rocks occasionally in the trail. You may find it much more efficient to step laterally to the side of a rock rather than to change the length of your stride to land before or after it.
Lateral movement can also be applied to switchbacks. Switchbacks are places in the trail where there is a 180-degree turn. They are designed for a quick elevation change over a short distance. Switchbacks can be intimidating as you must change your balance and shift your center of gravity in order to quickly move around the curve. The quicker you move, the more lateral your body becomes. It is possible to bank the turn of a switchback and maintain your momentum. Lean your body to the inside of the turn, making your body more ‘lateral’ as opposed to straight up and down and can even allow for acceleration through the turn.
Changing your foot’s direction as you descend may provide more traction. Although this is still considered forward progress, I am categorizing it under lateral movement as it is using a side motion to move ahead. When the trail gets slippery due to either extreme wet or dry conditions, you can turn your body at an angle of 45 to 90 degrees to the direction of the trail to increase traction and stability. In general, the rubber lugs on the bottom of a trail shoe are placed to prevent forward or backward sliding when you are moving forward. In a slippery situation, those lugs may not afford you the traction you need, but the edge of your outsole can. Dig into the trail’s substrate with the edge of your foot which is turned toward the hill. This action is akin to the motion a downhill skier might make when they want to slow down quickly, using the uphill edge of their skis to cut into the snow and create friction where it wasn’t before.
Conclusion
The key to trail running can be boiled down to balance. If you are well balanced, with your center of gravity well-positioned atop your feet—no matter if you are running uphill, downhill, or on the flats—you will be capable of running efficiently. Focus on body position, balance, and a light and quick turnover. The softer you come down on your feet, the quicker you will be able to pick them back up and the less time you will spend on the ground potentially losing your balance. Use the terrain to your advantage by recovering or accelerating when you can. Other than that, go out and have some good, dirty fun.
Call for Comments (from Meghan)
- What among these fundamental trail running techniques come easy for you? How did you become an expert in them?
- Which of these techniques do you feel you are yet to master? How do you try to actively improve your skills in them?
- Do you have any basic technique ideas you would like to add to those discussed in the article?
